

 Korean
  English
  Arabic
  German
  French
  Spanish
  Turkish
  Italian
  Russian
  Persian
  Bengali
  Hebrew
  Persian (Afghanistan)
  Scottish Gaelic
  Panjabi
  Croatian
  Slovenian
  Greek
Greek  Afrikaans
  Czech
Czech  Japanese
  Portuguese







How to Auto-Nest 50 UV Print Files: A Practical Batch Layout Automation Workflow
When a UV printing business handles five files at a time, manual layout may feel perfectly manageable. An operator opens each file, checks its size, rotates it if necessary, places it on the print bed, adjusts spacing, and then sends the completed layout to the RIP.
But what happens when five files become fifty?
Imagine receiving 12 acrylic sign files, 18 nameplate graphics, and 20 customized product designs in one production shift. The UV printer may be ready to work, yet the operator is still opening, resizing, rotating, duplicating, arranging, and checking files one by one.
At that point, printer speed is no longer the only issue. Prepress becomes the production bottleneck.
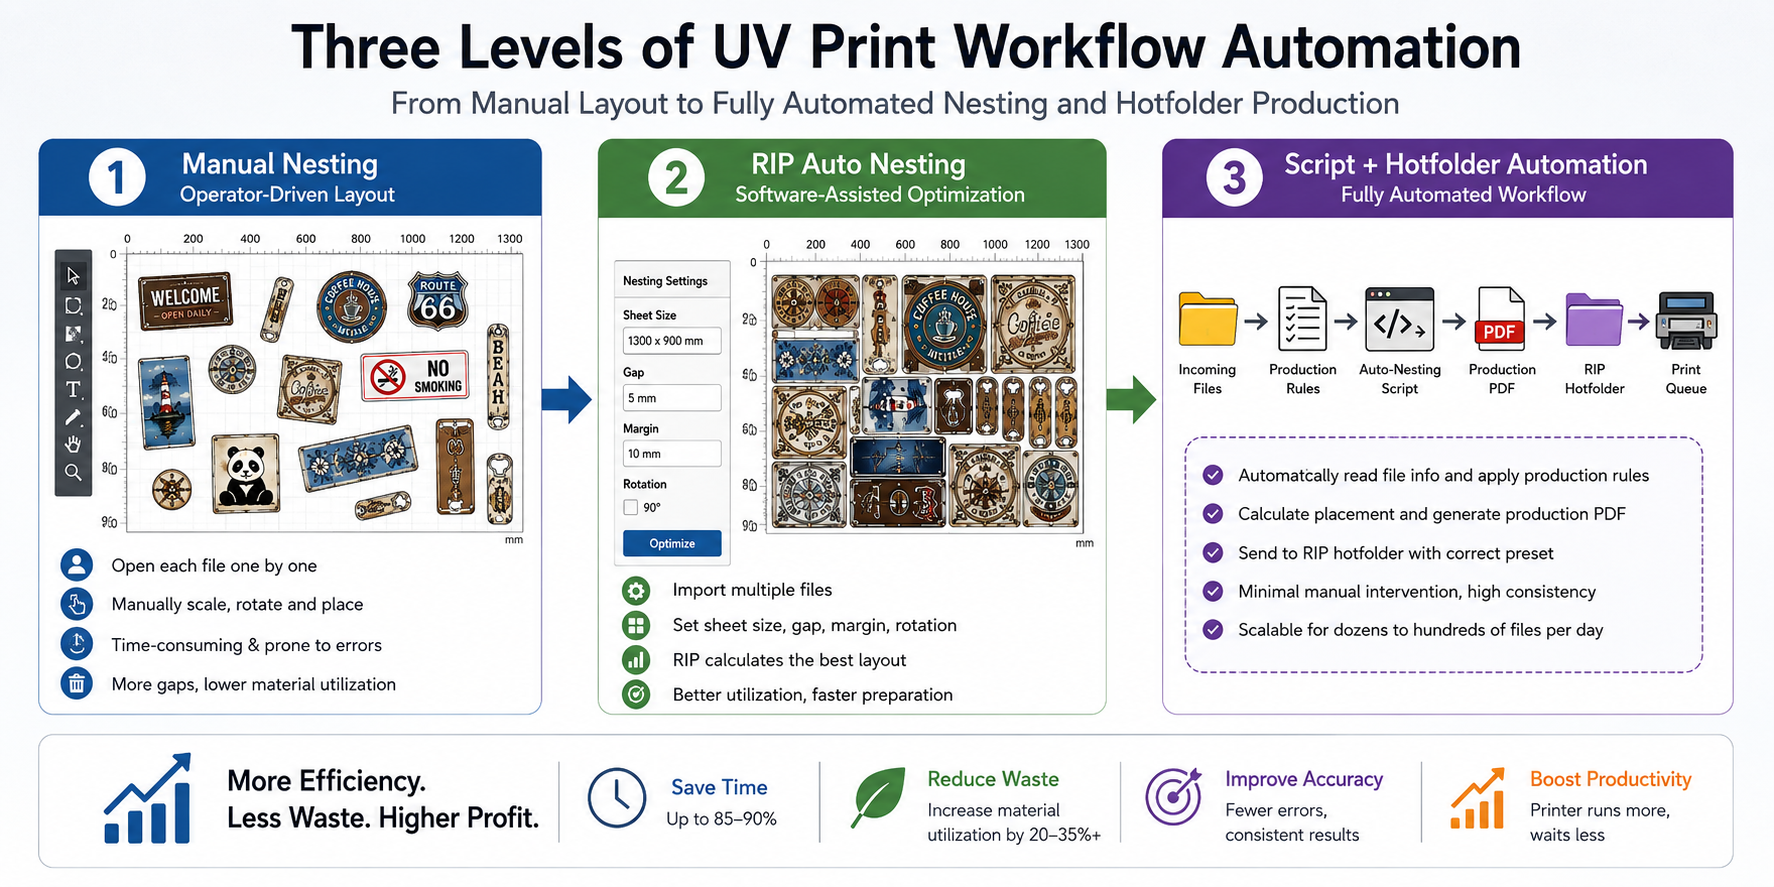
This is where automatic nesting for printing becomes valuable. Instead of manually positioning every file, a production team can move through three levels of automation:
Manual Nesting → RIP Auto Nesting → Rule-Based Script + Hotfolder Automation
This guide explains how these workflows work in real UV printing production, how to organize files before nesting, how to automatically arrange dozens of jobs on a fixed flatbed area, when automation should not be used, and how better prepress can reduce both labor time and material waste.
Why Manual Layout Becomes a Bottleneck
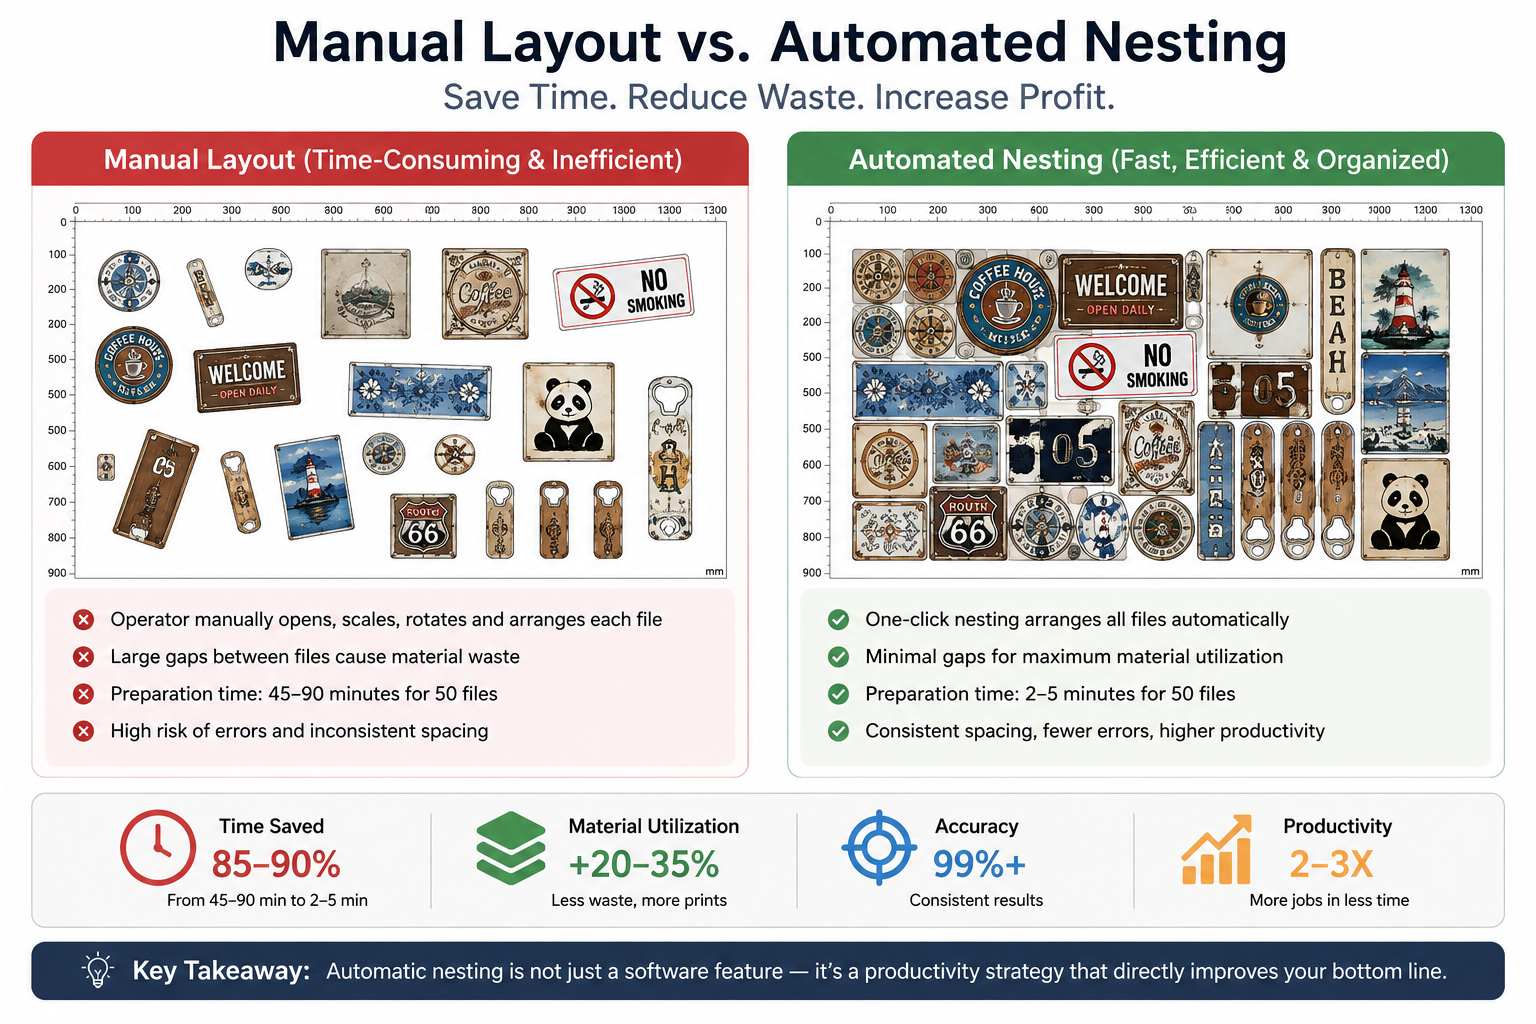
Manual layout is not automatically inefficient. For a small number of jobs, it may actually be the fastest and simplest solution. The problem begins when file volume grows faster than the operator’s ability to prepare those files.
5 Files vs. 50 Files vs. 500 Files
The right workflow depends on order volume, file complexity, material type, print mode, and how repetitive the production process is.
| File Volume | Typical Workflow |
|---|---|
| 1–5 files | Manual layout is usually sufficient |
| 5–30 files | Built-in RIP nesting becomes useful |
| 30–100 files | Rule-based batch nesting can improve consistency |
| 100+ files | Script and hotfolder automation may become worthwhile |
These numbers are not strict limits. A shop producing hundreds of identical labels may have a much simpler workflow than a shop processing 30 jobs with different materials, thicknesses, ink layers, and finishing requirements.
Hidden Costs of Manual Nesting
Operator Time
A few minutes spent arranging each file may not appear significant. Across 50 or 100 jobs, however, those minutes accumulate quickly. Operators also need time to verify dimensions, quantities, margins, print orientation, and output settings.
Material Waste
Manual layouts often leave unnecessarily large gaps or unused corners. Operators may also avoid rotating artwork because finding the optimal position manually takes additional time. The result can be lower substrate utilization.
Wrong Quantities
If one order needs 20 copies of File A, five copies of File B, and 12 copies of File C, manual duplication creates another opportunity for error. Missing or excessive copies may not be discovered until after printing.
Duplicate or Missing Files
Files may arrive through email, messaging applications, cloud storage, an ERP system, or a web store. Without a structured workflow, duplicate versions and missing files can easily enter production.
Automation therefore provides more than speed. It can also improve repeatability, traceability, and production consistency.
What Is Automatic Nesting for Printing?
Print nesting means arranging multiple print objects inside a defined printable area while respecting production constraints such as object spacing, edge margins, rotation, quantity, and substrate size.
For UV flatbed printing, this printable area is normally a fixed printer bed rather than an unlimited roll of media.
Rectangular Nesting
Rectangular nesting treats each artwork file as a rectangular bounding box. It is commonly suitable for acrylic signs, plaques, panels, nameplates, rectangular labels, and other regularly shaped products.
True-Shape Nesting
True-shape nesting analyzes the contour of irregular objects and attempts to place them closer together. It can be useful for letters, logos, decorative graphics, and contour-cut products.
However, UV printing requires more than geometric optimization. White ink layers, fixtures, primer requirements, print direction, and object height may be more important than squeezing one additional graphic onto the bed.
Rotation Rules
Allowing 90°, 180°, or 270° rotation can significantly improve space utilization, but free rotation is not appropriate for every job. Wood grain, brushed metal, directional signage, textured boards, and fixed jigs may require a specific orientation.
Gap and Margin Rules
Automatic print layout should distinguish between the gap separating two objects and the safety margin around the printable bed. A production workflow might start with an object gap of several millimeters, but the correct value depends on trimming, positioning accuracy, substrate characteristics, finishing processes, and the actual printer setup.
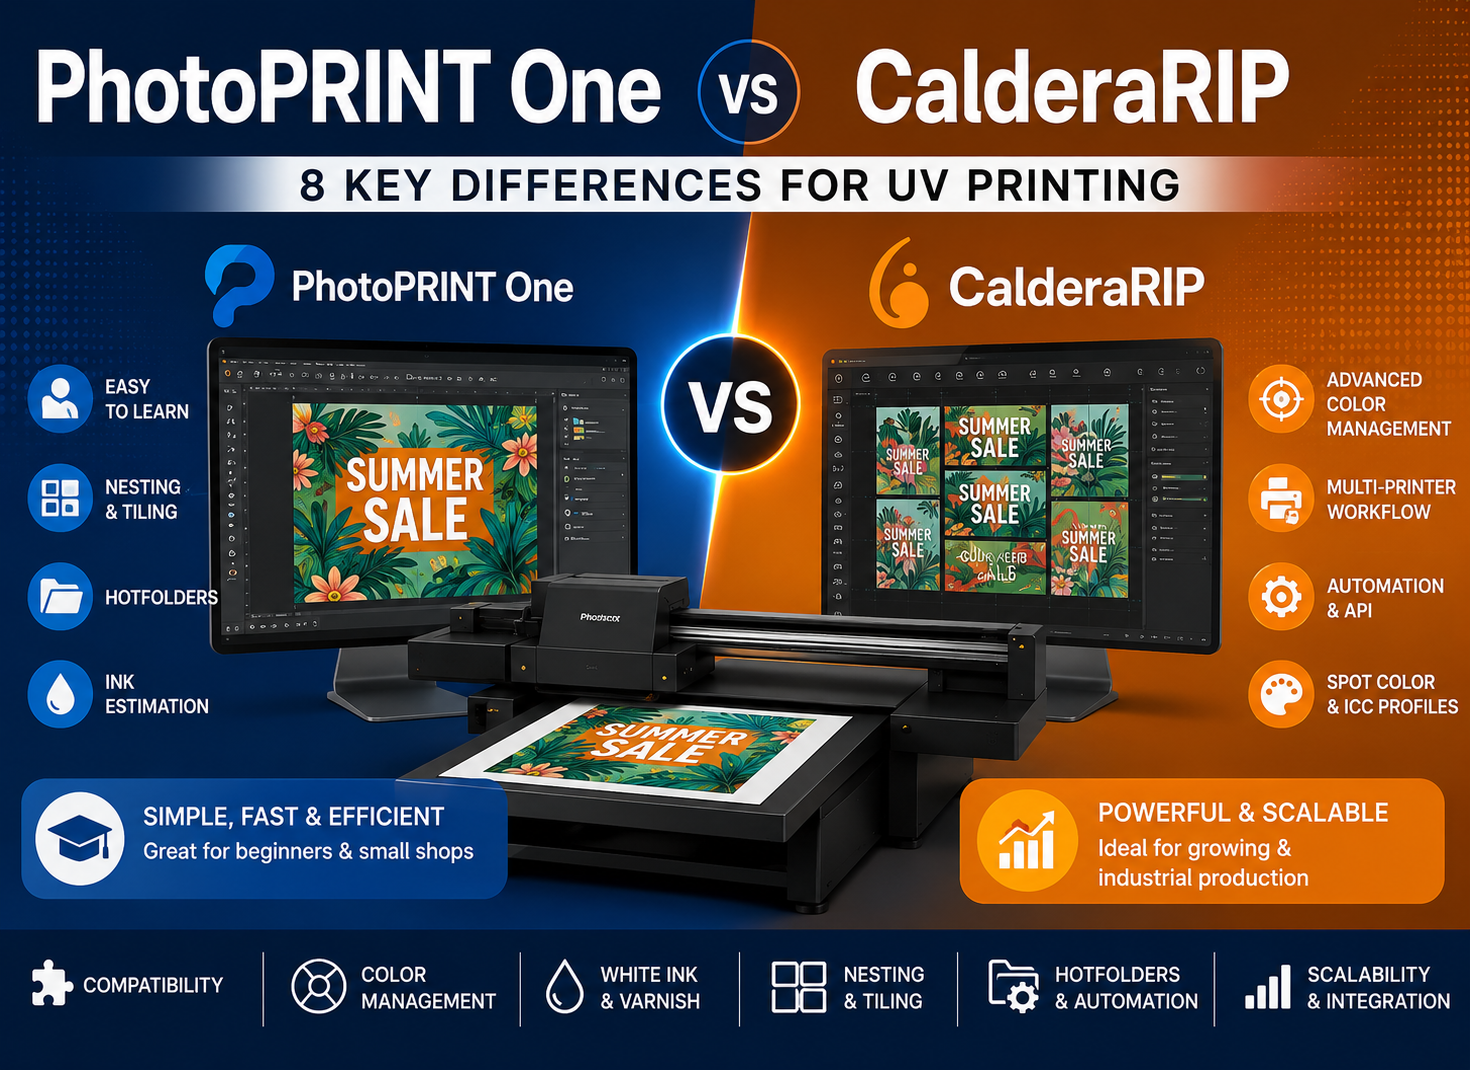
Level 1: Use Built-In RIP Nesting
The easiest way to begin UV printing nesting is to use the layout or nesting functions already available in a professional RIP workflow.
Import Multiple Files
Instead of opening one job at a time, import a group of production-ready files into the RIP. Depending on the software, common formats may include PDF, TIFF, PNG, JPEG, EPS, or other supported print formats.
Set the Sheet or Media Size
For flatbed UV printing, the media dimensions should reflect the usable printer bed or the actual substrate placed on the bed.
For example, a production workflow using a 1300 × 900 mm flatbed can define the available layout area before optimization begins.
Set Gaps and Margins
Define the minimum distance between jobs and keep a suitable margin around the outside edge. This prevents the nesting engine from creating a mathematically efficient but operationally inconvenient layout.
Allow Rotation
Rotation can be enabled only for jobs where direction is not critical. A good preset should contain this rule instead of requiring the operator to decide manually for every file.
Optimize the Layout
The RIP can then use dimensions, quantities, gaps, margins, and allowed rotation to calculate a more efficient arrangement.
This is an important first step, but it has one limitation:
A nesting engine may understand geometry, but it does not automatically understand every UV production rule.
Level 2: Rule-Based Batch Nesting
Once daily production becomes more complex, the question should no longer be simply, “Can these files fit on the same sheet?”
The more useful question is:
“Can these jobs actually be produced under the same printing conditions?”
This distinction is critical in UV printing.
Organize Jobs by Material
Acrylic, PVC, glass, wood, aluminum, foam board, leather, and other substrates may require different production settings. Files should therefore be grouped by substrate before automatic nesting begins.
Organize by Thickness
Two files printed on acrylic may still belong to different batches if one product uses 3 mm acrylic and another uses 10 mm acrylic. Different substrate heights may require different bed or carriage settings and should not be grouped simply because the artwork fits.
Organize by Print Mode
Jobs using different print modes may have different speed and quality requirements. For example, a production preset and a high-quality preset should generally be treated as different production groups.
The same logic applies when jobs require different pass settings or different uni-directional and bi-directional printing strategies.
Organize by White Ink Requirement
This is particularly important for UV printers because two visually similar files may use completely different ink structures.
Typical production groups may include:
- CMYK only
- White + Color
- Color + White
- White + Color + White
- Color + Varnish
- White + Color + Varnish
Combining jobs with incompatible ink structures can create more production problems than the nesting automation solves.
Organize by Primer or Pretreatment Requirement
Glass, metal, certain plastics, coated boards, and other materials may require different adhesion treatments. If one product requires primer while another does not, they may need to remain in separate batches even when they share the same thickness.
This is why effective batch file layout should combine geometric optimization with real production rules.
Level 3: Automate Nesting with a Script
When a production team repeatedly processes dozens or hundreds of files, the next step is to move file preparation upstream.
Instead of asking an operator to manually build every layout, a script can prepare the layout before the job reaches the RIP.
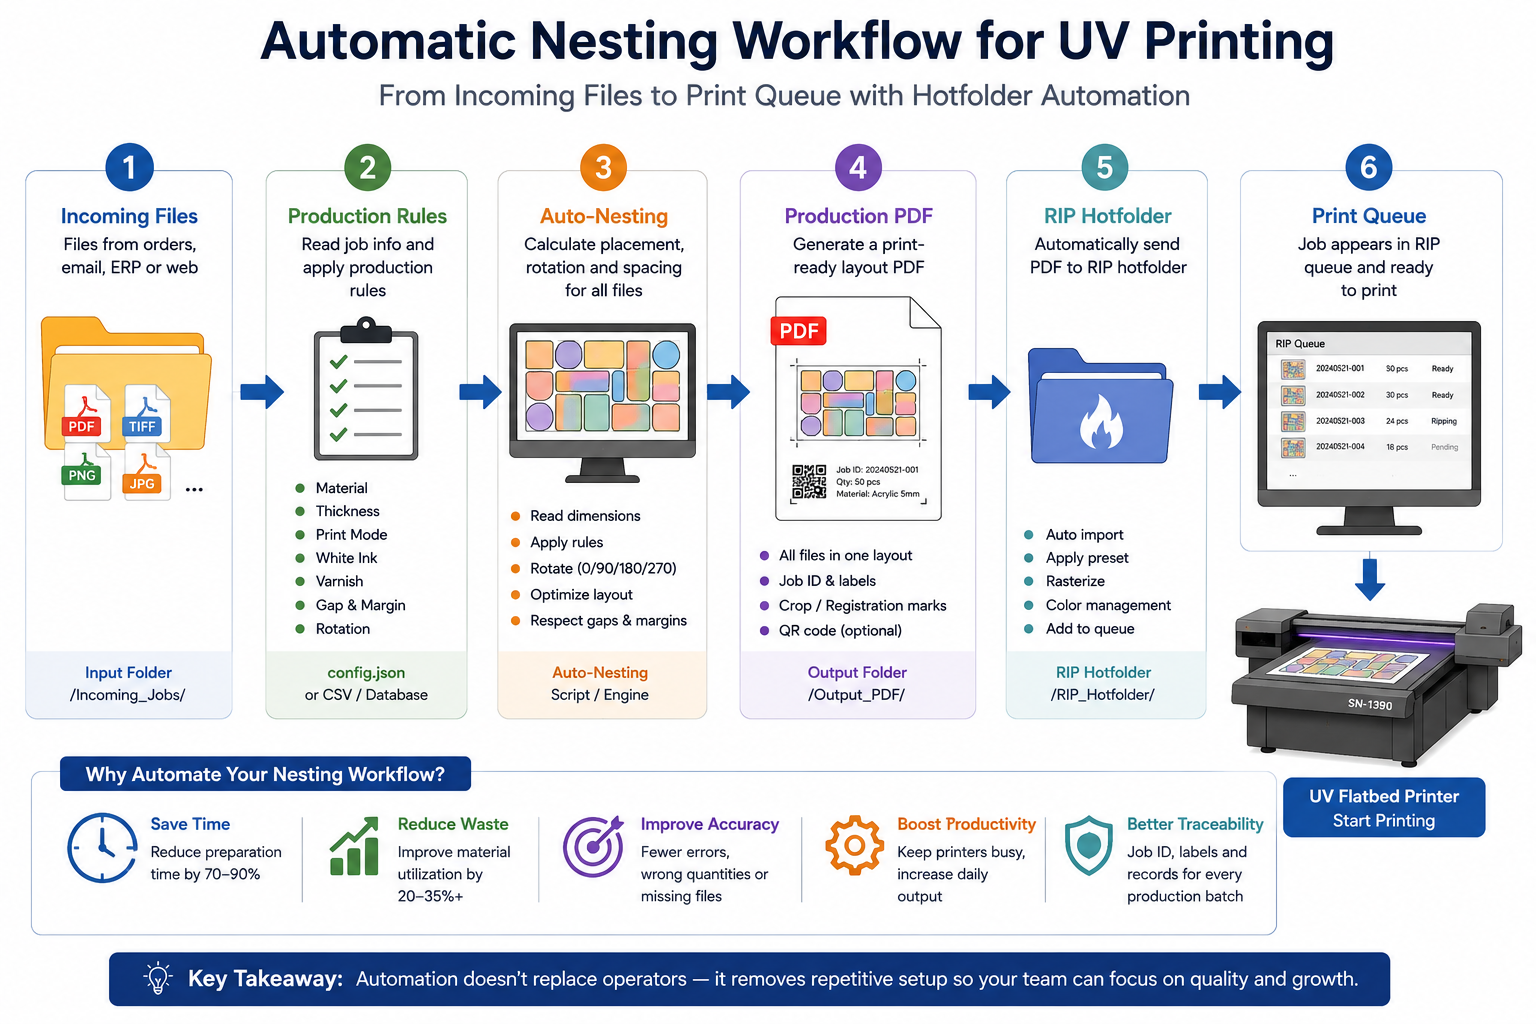
Step 1: Watch an Input Folder
The workflow begins with a monitored folder such as:
/Incoming_Jobs/
New print-ready files are copied or exported into this folder by the production system.
Step 2: Read File Dimensions
The automation system reads information such as file width, height, page size, resolution, filename, quantity, and available job metadata.
Step 3: Apply Production Rules
The script then decides which jobs can be nested together. Production information may come from folder names, filenames, a CSV file, an ERP export, or another structured data source.
For example:
Material: Acrylic
Thickness: 5 mm
Print Mode: Production
White Ink: Yes
Varnish: No
Rotation: 90 degrees allowed
Object Gap: 5 mm
Step 4: Calculate Placement
The nesting engine calculates each object’s X and Y position according to the usable bed dimensions, quantities, margins, rotation rules, and object spacing.
Step 5: Generate a Production PDF
The system can create one production-ready PDF containing all approved jobs in their calculated positions. Depending on the workflow, it may also add job IDs, file labels, registration marks, or production references.
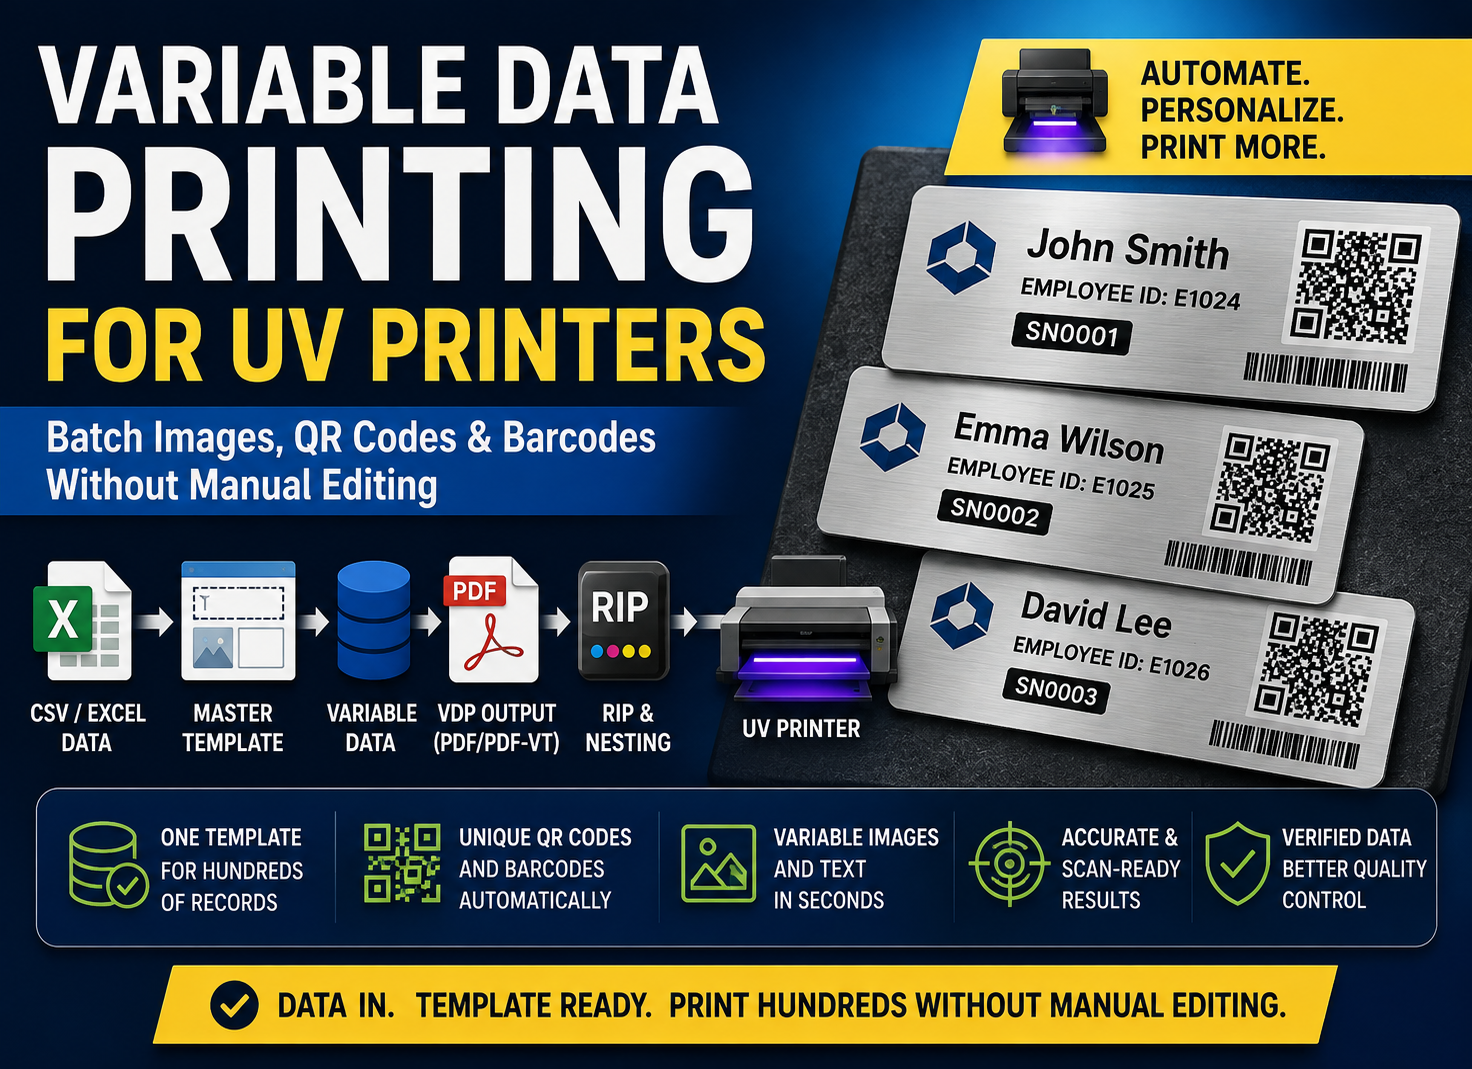
Variable data and barcode generation are separate workflow topics; the main purpose here is to automate the arrangement of already prepared production files.
Step 6: Send the File to a RIP Hotfolder
The generated production PDF can then be moved automatically to a predefined RIP hotfolder.
A hotfolder workflow can be configured so that files entering a specific folder automatically receive a corresponding RIP preset before being rasterized and added to the production queue.
The complete workflow becomes:
Incoming Files → Production Rules → Auto-Nesting → Production PDF → RIP Hotfolder → Print Queue
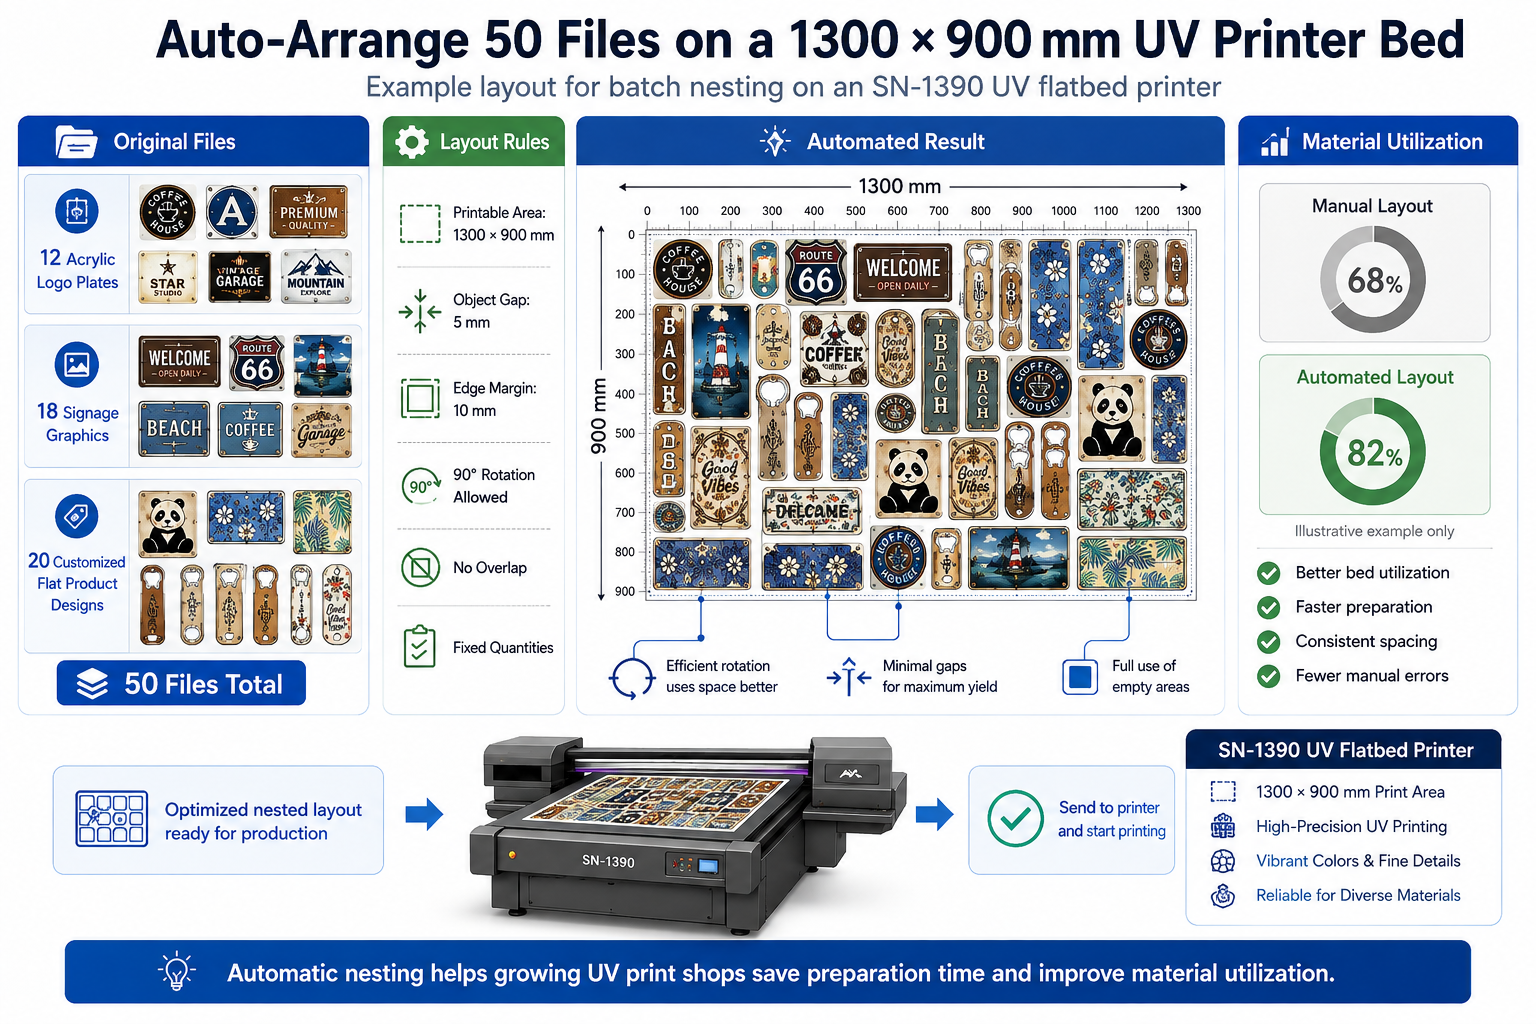
Example: Automatically Arrange 50 Files on a 1300 × 900 mm UV Printer Bed
Consider a practical production example using a 1300 × 900 mm printable area, such as the format used by an SN-1390 UV flatbed printer.
Original Files
Assume the operator receives 50 finished files:
- 12 acrylic logo plates
- 18 signage graphics
- 20 customized flat product designs
For this example, all 50 jobs use the same material, the same thickness, the same print mode, and the same ink-layer configuration. This is important because files should not be grouped merely because they fit on the same bed.
Layout Rules
The automated workflow is configured with the following example rules:
- Printable area: 1300 × 900 mm
- Object gap: 5 mm
- Edge margin: 10 mm
- 90° rotation allowed
- No overlapping
- Fixed production quantities
Automated Result
The nesting software or script reads the dimensions of all 50 files, tests different positions, rotates approved files when useful, maintains the defined spacing, and generates one or more optimized production layouts.
The operator’s role changes from manually placing every object to checking whether the automatically generated result is production-safe.
Material Utilization Calculation
A useful metric is:
Material Utilization = Total Printed Object Area ÷ Available Printable Area × 100%
For example, imagine that a manual layout uses only 68% of the available printable area while an optimized layout reaches 82%.
This does not mean automatic nesting will always improve utilization by 14 percentage points. The result depends heavily on object shapes, dimensions, quantities, rotation rules, and required margins. The figures are simply an illustration of how layout decisions can affect material usage.
When Automatic Nesting Should NOT Be Used
One of the most important principles in UV printer automation is that maximum bed utilization does not always equal maximum production efficiency.
Some jobs should remain separate even if combining them would create a denser layout.
Different Material Thicknesses
Substrates with different heights may require different machine settings and printhead clearances. Combining them can increase collision risk or require unnecessary setup changes.
Different White Ink Requirements
CMYK-only jobs and jobs using white ink may require different channel configurations, layer structures, curing strategies, or RIP presets.
Different Adhesion Treatments
Acrylic, glass, metal, and plastics may require different cleaning, primer, flame treatment, or adhesion procedures. Nesting them into one layout does not simplify the physical preparation process.
Different Jig Positions
Products such as phone cases, promotional items, small signs, or other fixed-position products may use dedicated fixtures.
In these situations, fixture layout overrides nesting optimization. Artwork must match the physical jig positions rather than an automatically optimized geometric arrangement.
Directional Materials
Wood grain, brushed aluminum, directional textures, and certain decorative boards should not be freely rotated. The automation system must preserve the intended material direction.
How Much Time Can Automatic Print Layout Save?
The actual savings vary by workflow, but a simple production model shows why automation becomes attractive as file volume increases.
Assume an operator spends an average of 1.5 minutes preparing each of 50 files:
50 jobs × 1.5 minutes = 75 minutes
Add final checking, duplication, layout adjustment, and export, and total prepress time may approach 90 minutes.
With a rule-based automated workflow, file detection and nesting may take only a few minutes, followed by approximately 5–10 minutes of operator verification.
In this simplified example, preparation might fall from about 90 minutes to approximately 10–15 minutes.
The important benefit is not only the saved time. The UV printer also spends less time waiting for the next production-ready layout.
Does Better Nesting Reduce UV Printing Cost?
Automatic nesting does not directly reduce the amount of UV ink required to print one square meter of artwork. It can, however, reduce several other components of production cost.
- Less unused substrate
- Less operator preparation time
- Fewer quantity mistakes
- Lower risk of missing files
- Less printer idle time between batches
- More predictable production scheduling
The result is potentially a lower cost per sellable product, especially in businesses processing many small or customized orders.
For a broader explanation of labor, material, equipment utilization, and profitability, see our UV Printing ROI & Pricing Strategy resources.
Choosing the Right Automation Level for Your UV Printing Business
Not every UV printing company needs a custom script. The best solution is the lowest level of automation that reliably removes the current bottleneck.
| Production Situation | Recommended Workflow |
|---|---|
| Few files and low daily volume | Manual layout |
| 10–30 files per batch | RIP nesting |
| Repeated job types | Saved presets and job grouping |
| 30–100 files per batch | Rule-based batch nesting |
| Hundreds of daily files | Script + hotfolder automation |
| Web-to-print or ERP-driven production | Integrated workflow automation |
Automation should not be adopted simply because it sounds advanced. The investment makes sense when the value of reduced labor, fewer errors, better material utilization, and faster job preparation exceeds the cost of implementation and maintenance.
Download the Batch Nesting Script
A practical next step is to create a reusable automation package containing an example nesting script and configuration file.
A future download package could include:
UV-Auto-Nesting-Script/
├── auto_nest.py
├── config.json
├── sample_jobs.csv
├── input/
├── output/
└── README.md
Download the UV Auto-Nesting Script & Configuration Template
If the downloadable script is not yet available, remove the download link until the actual file has been prepared. Do not publish a non-functional download button.
Frequently Asked Questions About Automatic Nesting for Printing
What is automatic nesting for printing?
Automatic nesting for printing is the process of using software or scripts to arrange multiple print files within a defined printable area while following rules such as quantity, spacing, margins, rotation, and production compatibility.
Can a RIP automatically arrange multiple UV print files?
Many professional RIP workflows include layout, duplication, grouping, or nesting functions. Their capabilities vary, so production teams should verify whether their RIP supports fixed-bed dimensions, rotation rules, spacing, quantities, and automated job presets.
Can I automatically nest 50 images for UV printing?
Yes, provided the files can be produced under compatible conditions. Before nesting them together, check material, thickness, print mode, white ink structure, pretreatment requirements, orientation, and fixture requirements.
Does automatic nesting reduce material waste?
It can improve material utilization by reducing unnecessary gaps and making better use of available space. However, the improvement depends on file sizes, shapes, margins, allowed rotation, quantities, and production constraints.
What is the difference between nesting and step-and-repeat?
Step-and-repeat usually duplicates the same design multiple times at defined intervals. Nesting focuses on arranging multiple objects or files efficiently within the available production area. A workflow may use both techniques when an order contains different designs with multiple quantities.
What is a RIP hotfolder?
A RIP hotfolder is a monitored folder associated with predefined processing settings. When a production-ready file enters the folder, the RIP can automatically import it and apply the corresponding workflow preset, reducing repetitive manual setup.
Conclusion: Automate Prepress Before It Limits Production
When a UV printing company moves from five files per batch to fifty or hundreds of files per day, production efficiency is no longer determined by printer speed alone.
File preparation can become the bottleneck.
A practical upgrade path is:
Manual Layout → RIP Nesting → Rule-Based Batch Nesting → Script + Hotfolder Automation
The goal is not to automate every possible task. It is to remove repetitive file preparation while keeping the production rules that matter: material, thickness, print mode, white ink, pretreatment, orientation, and fixture position.
For growing UV printing businesses, a well-designed print workflow automation system can reduce operator workload, improve material utilization, decrease preventable errors, and keep the UV printer producing instead of waiting for files.
If your production team is processing dozens or hundreds of files every day, improving prepress workflow may deliver more productivity than simply increasing printer speed.
Contact us to discuss UV printer, RIP workflow, and production automation solutions.