

 Korean
  English
  Arabic
  German
  French
  Spanish
  Turkish
  Italian
  Russian
  Persian
  Bengali
  Hebrew
  Persian (Afghanistan)
  Scottish Gaelic
  Panjabi
  Croatian
  Slovenian
  Greek
Greek  Afrikaans
  Czech
Czech  Japanese
  Portuguese









UV Printer Maintenance Checklist: Daily, Weekly and Monthly Tasks
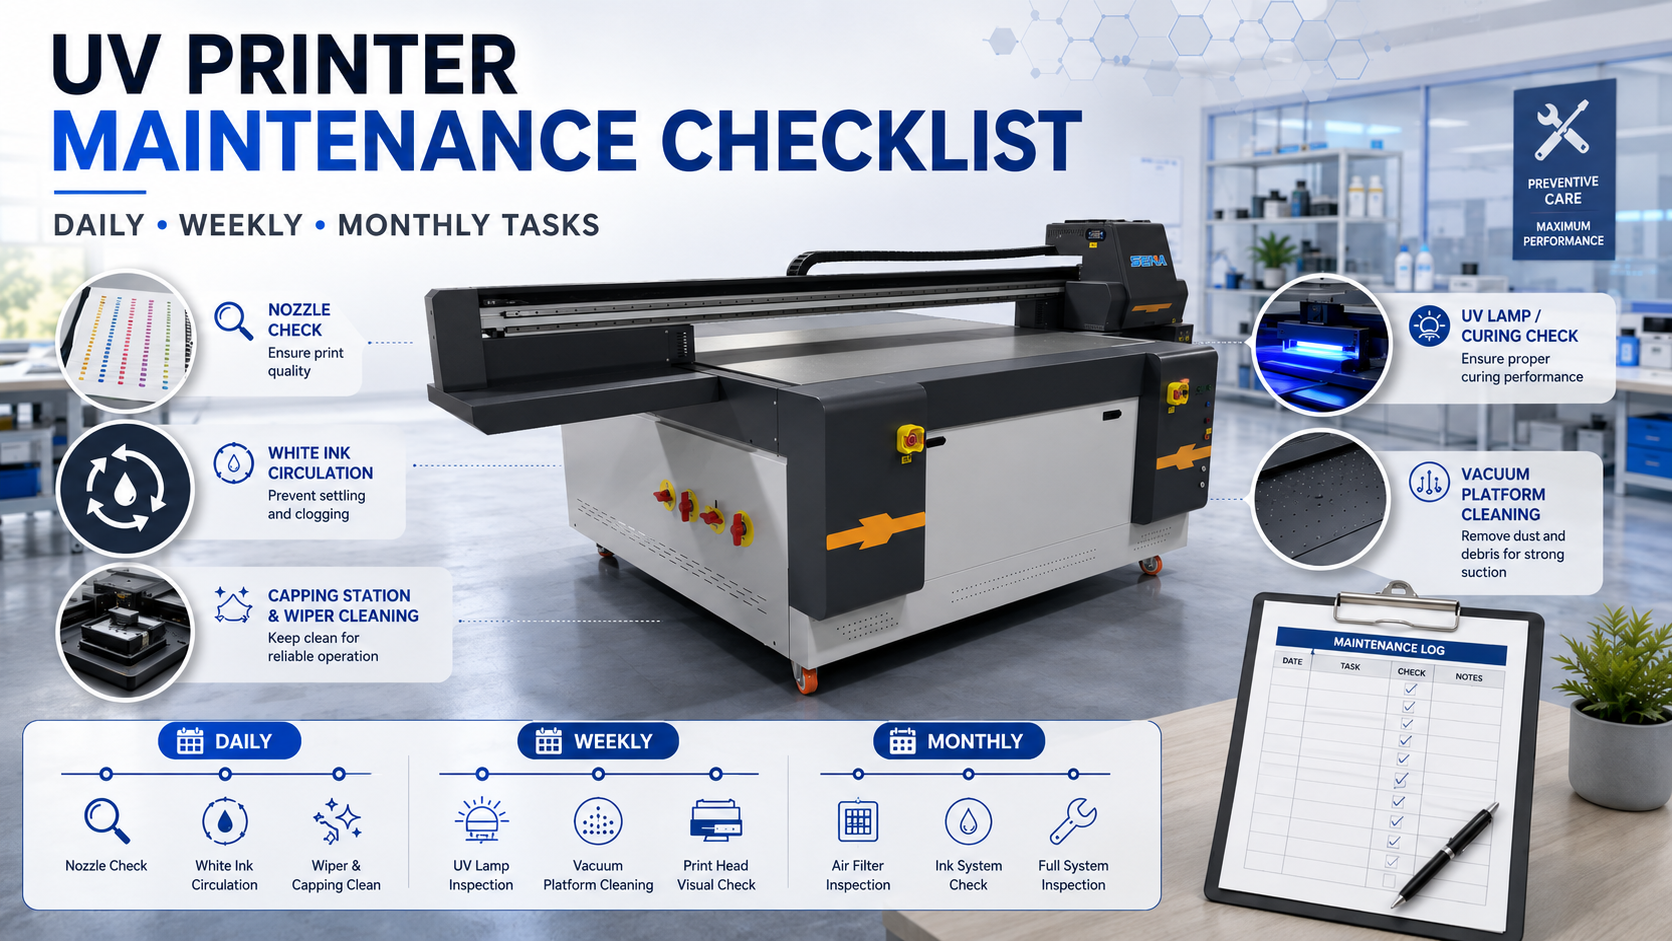
A reliable UV printer maintenance checklist helps prevent clogged nozzles, unstable white ink, poor curing, unexpected downtime and avoidable printhead damage. Maintenance does not need to be complicated, but it must be performed in the correct order. The best routine is to inspect the printer first, take action only when needed, verify the result and record any change.
Important: UV printers use different printheads, ink systems, pumps, pressure settings and automatic maintenance programs. Always follow the operating manual and technical instructions supplied with your specific printer. Do not remove printheads, open ink lines or change pressure settings unless you have been trained to do so.
Why Does a UV Printer Need a Maintenance Schedule?
A UV printer may continue operating even when small maintenance problems have already started. A few missing nozzles, a dirty wiper, a weak capping seal or slightly separated white ink may not stop the machine immediately. However, these small issues can gradually become visible banding, weak white coverage, excessive cleaning, wasted ink, reprints or complete production interruption.
Preventive Maintenance vs. Emergency Repair
Preventive maintenance is performed before a fault stops production. It includes nozzle checks, visual inspections, cleaning accessible maintenance parts and recording changes. Emergency repair begins after print quality has already declined or a mechanical, ink-supply or electrical problem has caused downtime.
A planned schedule creates a baseline. If cleaning frequency increases, inspect the cap, wiper and ink supply before assuming that the printhead must be replaced.
Maintenance Frequency Depends on Actual Use
There is no single schedule that fits every workshop. A machine printing high white-ink coverage for two shifts per day requires more frequent inspection than a machine used for occasional samples. Dusty materials, high temperatures, low humidity, static electricity, ink mist and frequent printing on warped products can also increase maintenance needs.
Safety Rules Before Maintaining a UV Printer
Good maintenance protects the machine only when it is performed safely. Before touching any maintenance area, pause the printer, follow the control-panel instructions and confirm whether the machine should remain powered on or be switched off for that task.
Prepare the Correct Tools
Prepare lint-free cleaning sticks, approved maintenance liquid, gloves, a flashlight, a waste container and a maintenance record.
Avoid Unapproved Cleaning Materials
Do not use ordinary tissue, loose-fiber cotton swabs, tap water, unknown solvents or metal tools around the printhead. Do not assume that alcohol is safe for every surface. Some cap tops, rubber parts, coatings and nozzle components can be damaged by an incompatible chemical.
Separate Operator Tasks from Technician Tasks
Operators can perform nozzle checks, platform cleaning and approved surface maintenance. Printhead removal, ink-line disassembly, pressure adjustment, electrical testing and motion calibration require trained technicians.
Daily UV Printer Maintenance Checklist
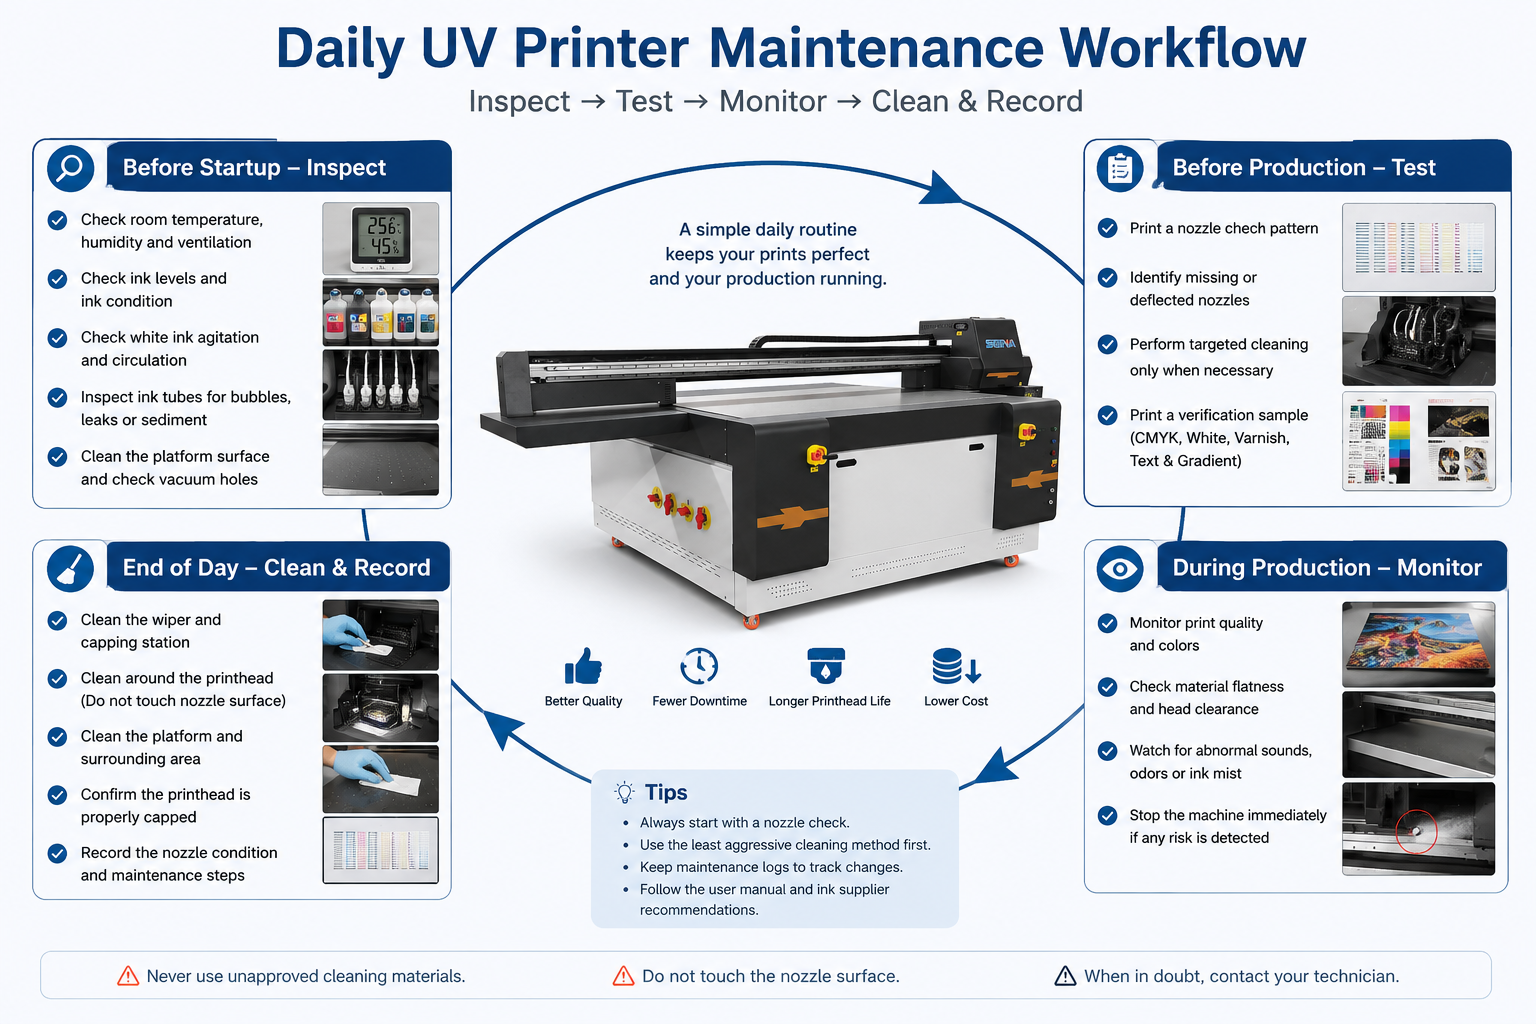
Divide daily maintenance into four stages: before startup, before production, during printing and at the end of the day.
| Time | 유지 보수 작업 | What to Check | Required Action |
|---|---|---|---|
| Before startup | Environment and ink system | Dust, temperature, ink level, leaks and white-ink circulation | Correct abnormal conditions before printing |
| Before production | Nozzle check and test print | Missing, weak or deflected nozzles | Use targeted cleaning only when required |
| During production | Material and print quality | Warping, movement, banding, ink mist and abnormal sound | Pause production when a risk appears |
| End of day | Maintenance station and platform | Ink buildup, debris, cap condition and waste ink | Clean, cap correctly and record the result |
Before Starting the Printer
1. Check the Working Environment
Confirm that ventilation openings are clear and no dust-producing work is taking place beside the machine. Follow the operating range specified for your printer and ink.
2. Check Ink Levels and Ink Condition
Check CMYK, white ink and varnish levels. Look for leaks, folded tubes, unusual bubbles or thickened ink. Do not mix formulations without written compatibility confirmation.
3. Check White Ink Agitation and Circulation
White ink requires more attention than CMYK. Confirm that agitation and circulation operate normally, and look for severe separation, interrupted return flow, pump noise or large bubbles.
Circulation reduces pigment settling but does not replace nozzle checks. White-ink system designs vary by machine.
4. Inspect the Printing Platform
Remove cured ink, tape, dust and material fragments. Clear blocked vacuum holes and confirm that the product is flat and securely held.
Before the First Production Job
1. Print a Nozzle Check
Print a nozzle check before important jobs, after a long idle period or whenever output shows lines, missing colors or uneven white ink.
A complete pattern can normally proceed to production. Random gaps may need light cleaning, while a large missing section can indicate cap sealing, air or ink-supply problems.
2. Start with the Least Aggressive Corrective Action
Do not begin with repeated powerful cleaning. Identify the affected channel, run the recommended or light cleaning mode and print another nozzle check. If there is no improvement, inspect the accessible capping and wiping areas.
3. Print a Small Verification Sample
Before an expensive batch, print a small sample with CMYK, white ink, small text and any varnish layer to verify nozzle condition, alignment and curing.
During Production
1. Monitor Material Flatness and Head Clearance
Watch for lifting, vacuum loss or movement. Use suitable fixtures and confirm printing height before starting.
2. Watch for Changes in Print Quality
Pause the job if you see banding, fading color, changing white density, uneven varnish, doubled edges or excessive ink mist.
3. Stop After Abnormal Contact, Sound or Leakage
Stop the machine after a head strike, unexpected carriage noise, material collision, ink leak, repeated motion error or abnormal UV-lamp warning. Do not continue production simply because the printer can still move. Photograph the condition and contact technical support when the cause is not obvious.
End-of-Day Maintenance
1. Inspect and Clean the Wiper and Capping Area
Ink buildup or fibers on the wiper and cap can reduce cleaning effectiveness. Use the approved maintenance position and method, and do not press against the nozzle surface.
2. Clean the Platform and Nearby Surfaces
Remove cured droplets, dust and coating residue so the platform remains flat and clear.
3. Confirm Correct Capping and Waste-Ink Capacity
Confirm that the carriage returns home, the printhead caps correctly and the waste-ink container is below its safe limit.
4. Record the Nozzle Condition
Save or photograph the final nozzle test. Record the operator, date, missing channels, cleaning cycles and unresolved issues.
Weekly UV Printer Maintenance Checklist
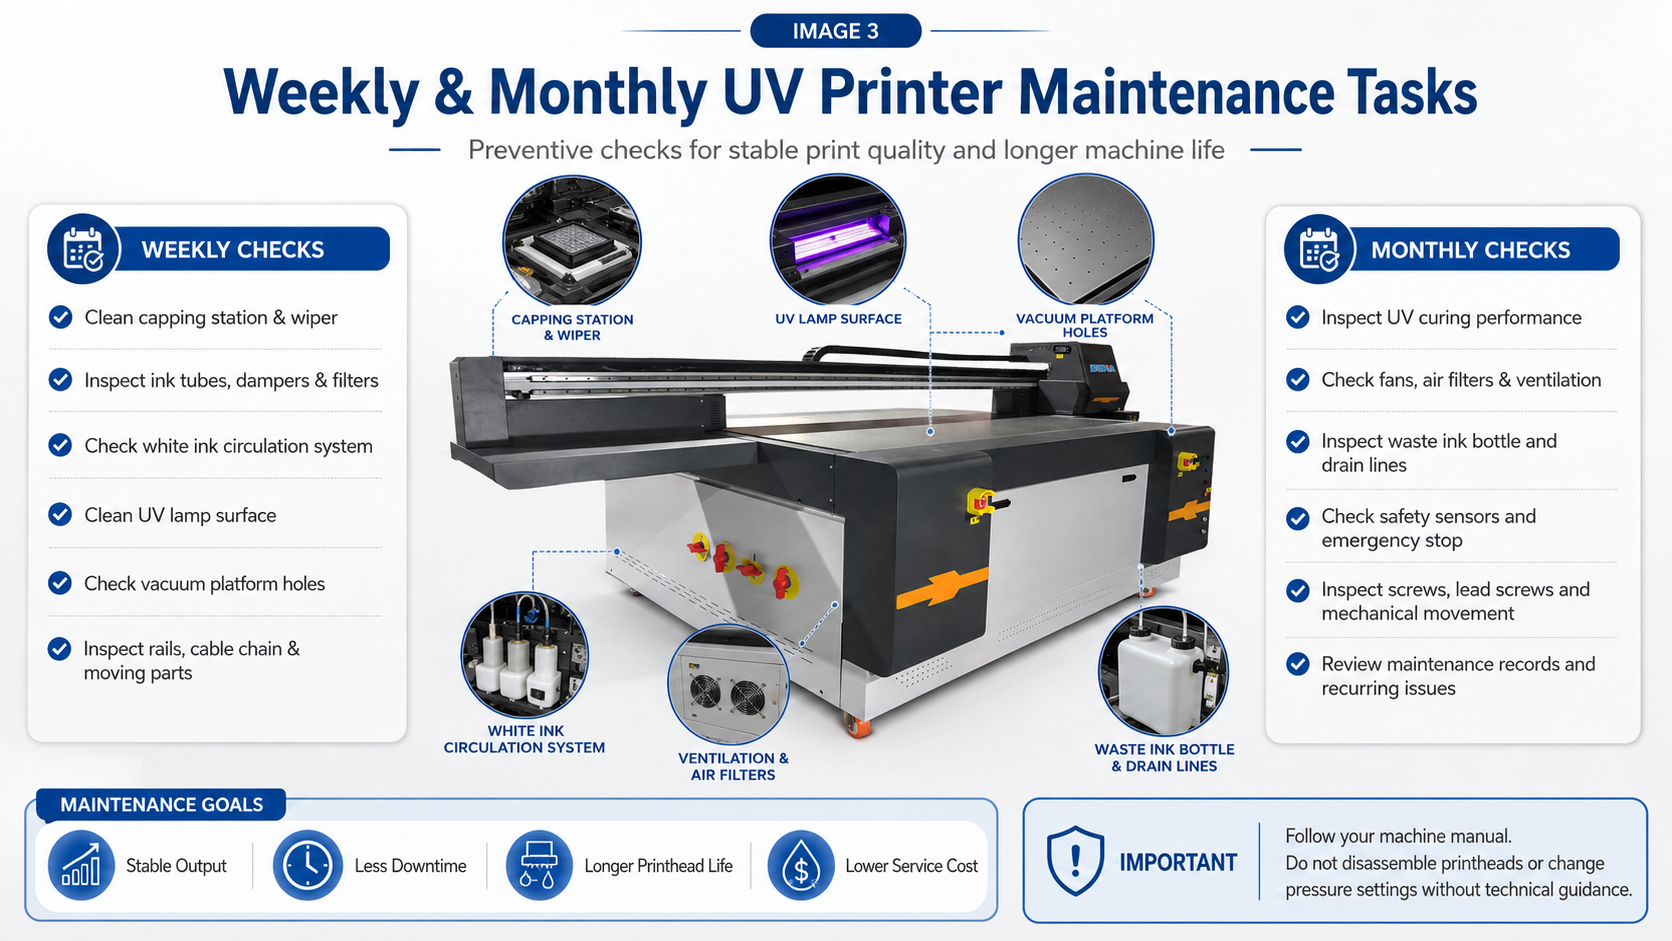
Clean the Capping Station and Wiper Thoroughly
Inspect the cap edge, wiper blade and flushing area. Remove buildup with approved liquid and replace damaged parts when cleaning cannot restore them.
Inspect Ink Tubes, Dampers and Filters Visually
Look for bubbles, leaks, sharp bends or sediment. Do not remove dampers or disconnect tubes unless technical support instructs you.
Check the White Ink System
Confirm that agitation, circulation and the white nozzle pattern remain stable. Record whether circulation restores weak density.
Clean the UV-Lamp Cover and Cooling Area
Follow the shutdown and cooling procedure, clean approved UV-light surfaces and clear obstructed fans or air passages. Never look directly into an operating UV light.
Check the Vacuum Platform
Clear blocked vacuum holes and check for even suction or unusual pump sound.
Inspect Moving Components Without Changing Settings
Inspect rails, belts, lead screws, cable chains and encoder areas for contamination. Do not adjust alignment or motor settings without technical guidance.
Monthly UV Printer Maintenance Checklist
Inspect UV Curing Performance
Use a consistent test to check for tacky surfaces, uneven gloss, poor adhesion or left-to-right curing differences. Clean the lamp cover before assuming that the UV module has failed.
Clean Fans, Filters and Ventilation Openings
Inspect control-cabinet, UV, power-supply and vacuum-pump ventilation. Remove dust using the supplier’s approved method.
Inspect the Waste-Ink System
Check the waste bottle, drain tube and visible connectors for leakage, blockage or backflow. Record unusual increases in waste ink.
Check Mechanical and Safety Components
Test safety devices according to the manual and inspect sensors, platform lifting, cable routing and visible screws. Report vibration or repeated position errors.
Review the Monthly Maintenance Record
Review nozzle tests for repeated color problems, increasing cleaning frequency, unstable white ink or recurring collisions.
Adjust the Maintenance Schedule to Your Production Volume
Light or Occasional Use
A printer used only for samples may face more idle-time risk than production wear. Maintain the required power and automatic-care settings, print nozzle checks regularly and follow the supplier’s instructions for white ink. Do not leave the printer unused for long periods without a storage plan.
Normal One-Shift Production
For regular daily production, perform a nozzle check before important jobs, complete end-of-day cleaning and inspect the white-ink system daily. Use the weekly and monthly schedule in this guide as a baseline.
Heavy or Multi-Shift Production
High white coverage, varnish, embossed printing and multiple shifts create more ink mist and maintenance demand. Divide responsibility by shift, record nozzle condition at handover and inspect the platform, cap and wiper more frequently.
Dusty, Hot or Static-Prone Workshops
Shorten inspection intervals for fans, filters, platform surfaces, material debris and encoder areas. Improve room cleanliness and material preparation rather than relying only on additional printhead cleaning.
UV Printer Maintenance Before a Long Shutdown
Shutdown for One to Three Days
Complete normal end-of-day maintenance, confirm correct capping and verify the required white-ink and automatic-maintenance settings. Whether the main power should remain on depends on the printer design, so follow the machine manual.
Shutdown for One to Two Weeks
Many printers require a specific storage or keeping-preparation procedure. Contact the supplier before the shutdown date, especially for white-ink machines. The process may involve approved maintenance liquid, protected ink paths or special power settings.
Long-Term Storage
Do not use a generic flushing method from another printer model. Save RIP settings and machine parameters, record the shutdown procedure and protect the printer from dust and extreme temperature changes. Restart the machine only after completing the supplier’s recovery procedure.
Downloadable UV Printer Maintenance Log
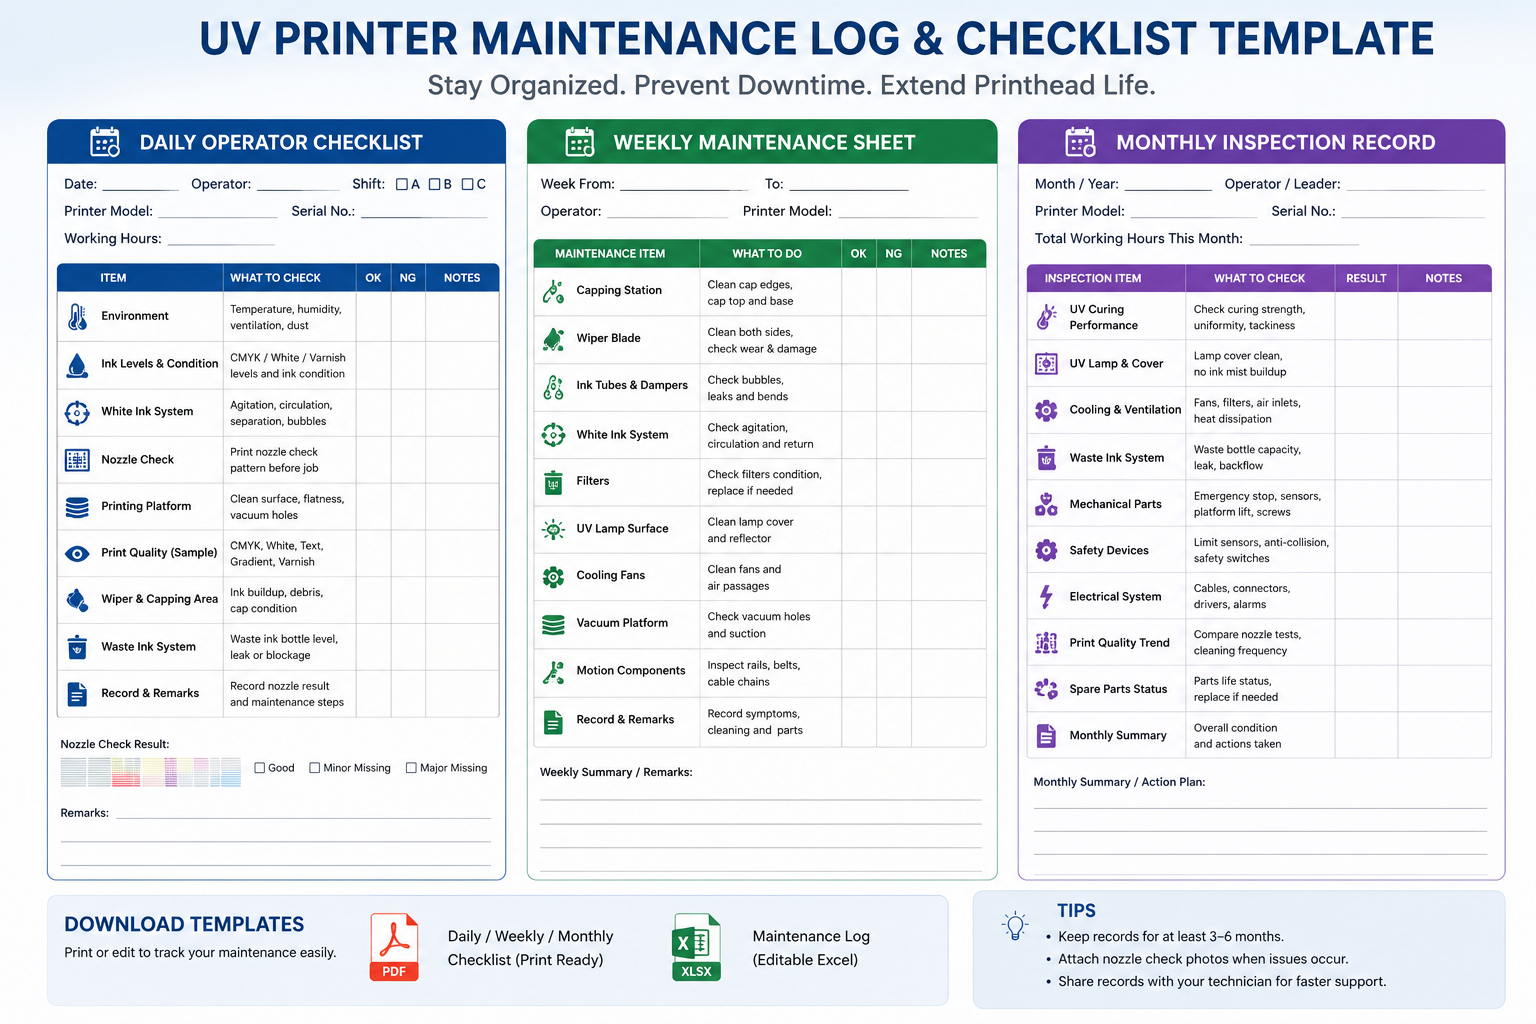
A maintenance log turns routine cleaning into useful diagnostic information.
Recommended Maintenance Log Fields
- Date and operator name
- Printer model and production hours
- Nozzle-check result
- White-ink circulation status
- Cap, wiper and platform condition
- Cleaning mode used
- Ink, filter or maintenance-part replacement
- Abnormal sound, leakage, error code or print defect
- Whether engineer follow-up is required
When requesting support, send the latest nozzle test and maintenance record with photos or videos.
Download the Maintenance Checklist
Replace the buttons below with the URLs of your PDF and Excel maintenance forms.
Common UV Printer Maintenance Mistakes
Cleaning Without Printing a Nozzle Check
Without a before-and-after nozzle pattern, the operator cannot confirm which channel is affected or whether cleaning has improved the condition. Always keep evidence of the starting point.
Repeating Powerful Cleaning Cycles
Heavy cleaning is not a universal solution. If the pattern remains unchanged, inspect the cap, wiper, ink supply and visible tubes, then contact support. Continuing to clean may waste ink without addressing the cause.
Touching or Scraping the Nozzle Surface
Do not touch the nozzle plate with fingers, hard tools or ordinary cloth. Follow the procedure for the printhead model.
Mixing Inks or Maintenance Fluids
Use approved ink and cleaning liquid, and obtain guidance before changing ink systems.
Ignoring Slightly Warped Materials
A raised corner can cause a head strike. Check every board and use suitable fixtures.
When Should You Stop and Contact a Technician?
Stop self-maintenance and contact technical support when you see any of the following:
- A large nozzle loss immediately after a head strike
- Ink leaking near cables, connectors or circuit boards
- One complete color channel disappearing suddenly
- Persistent white-ink dripping or uncontrolled ink flow
- Repeated pressure, pump, motor, encoder or UV-system alarms
- Abnormal heat, smoke or a burning smell
- No improvement after the approved basic cleaning sequence
- Unusual carriage, platform or lifting-system movement
Before contacting support, prepare the printer model, serial number, printhead type, RIP software version, nozzle-test photo, full print photo, close-up defect photo, error message and a short video showing the abnormal operation.
Frequently Asked Questions About UV Printer Maintenance
How often should a UV printer be cleaned?
Inspect the printer every production day, but clean each part according to its condition and the manufacturer’s schedule. The platform and accessible maintenance areas may need daily attention, while fans, filters and curing components may be checked weekly or monthly.
Should I clean the UV printhead every day?
Do not automatically perform a strong head cleaning every day. Print a nozzle check first. If the pattern is complete, unnecessary cleaning wastes ink. If nozzles are missing, begin with the recommended or light cleaning mode.
How often should white ink be circulated?
Follow the automatic circulation and agitation program designed for the machine. Operators should confirm daily that the system is actually working and that white density remains stable.
Can I leave a UV printer turned off overnight?
This depends on the printer. Some machines require power for automatic maintenance, while others have a different shutdown procedure. Follow the supplier’s instructions rather than using a universal rule.
Can alcohol be used to clean a UV printhead?
Use only a cleaning fluid approved for the printer, printhead, ink and maintenance parts. Alcohol may damage some rubber, coating or nozzle components and should not be used unless specifically approved.
Why are nozzles still missing after cleaning?
Possible causes include poor cap sealing, a dirty or damaged wiper, air in the ink line, a blocked filter or damper, unstable ink pressure, settled white ink, a damaged printhead or an electrical problem.
What should I do before a long holiday?
Complete normal maintenance and ask the supplier whether the printer requires a storage-preparation process. White-ink printers and long shutdowns often need more than a standard power-off procedure.
Which maintenance tasks require an engineer?
Printhead removal, ink-line disassembly, negative-pressure adjustment, pump or valve replacement, electrical diagnosis and motion-system calibration should be completed by trained personnel.
Final UV Printer Maintenance Recommendations
A good UV printer maintenance checklist is based on consistency, not excessive cleaning. Check the nozzle condition before production, monitor white ink and material flatness, keep the cap, wiper and platform clean, inspect curing and ventilation regularly, and record changes over time.
When a problem does not respond to the approved basic procedure, stop and collect diagnostic information instead of repeatedly cleaning or dismantling parts. This protects the printhead and helps the technical team solve the problem faster.
Need a Maintenance Plan for Your UV Printer?
Contact our technical team for a maintenance schedule based on your printer model, printhead configuration, ink system and daily production volume.