

 Spanish
  English
  Arabic
  German
  French
  Turkish
  Italian
  Russian
  Persian
  Bengali
  Hebrew
  Persian (Afghanistan)
  Scottish Gaelic
  Panjabi
  Croatian
  Slovenian
  Greek
Greek  Afrikaans
  Czech
Czech  Korean
  Japanese
  Portuguese










UV Printhead Maintenance: How to Extend Ricoh and Epson Printhead Life
UV printhead maintenance has a direct effect on print quality, machine uptime, ink consumption and long-term operating cost. However, extending printhead life does not mean performing powerful cleaning every day. A better approach is to inspect the nozzle condition, identify the real cause of a problem, use the least aggressive corrective action and verify the result before continuing production.
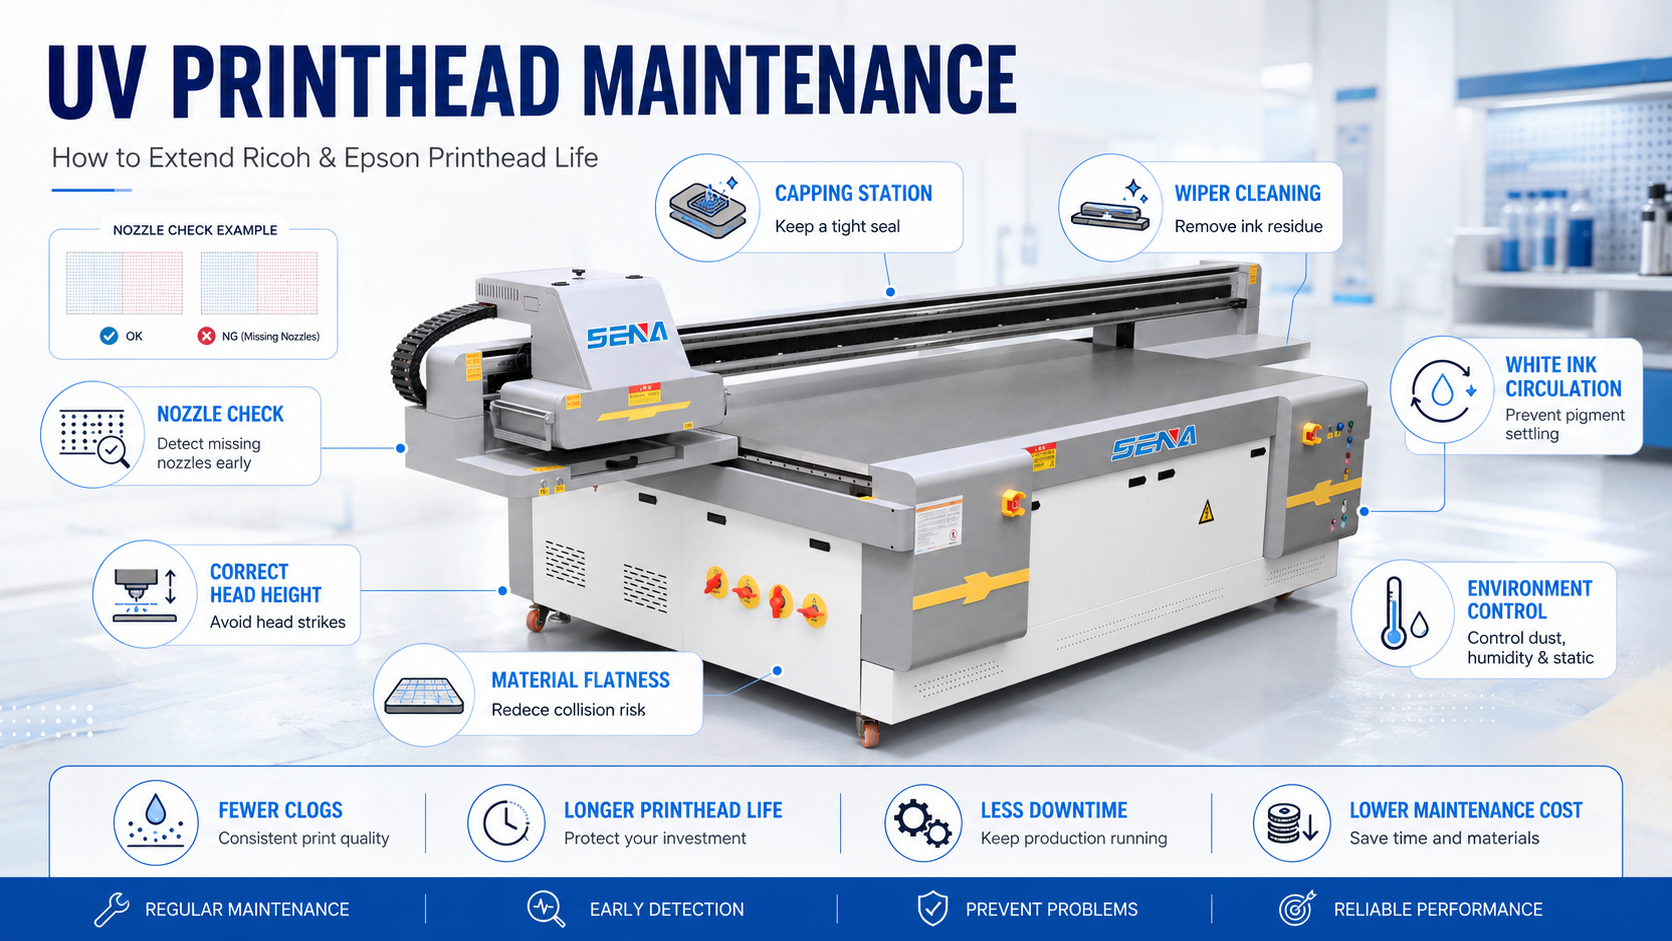
The actual service life of a Ricoh or Epson UV printhead depends on many factors, including ink compatibility, printing frequency, white ink circulation, capping quality, cleaning methods, working environment, material flatness and printhead height. Physical collisions and incorrect maintenance can damage a printhead much faster than normal printing.
This guide explains how to maintain Ricoh and Epson UV printheads, prevent nozzle clogs, reduce head-strike risks and distinguish a recoverable nozzle problem from an ink-supply or physical damage issue.
Important: Printhead models, ink systems, cleaning menus and pressure settings vary between UV printers. Always follow the operating manual and technical instructions supplied with your machine. Do not remove a printhead, disconnect ink tubes or adjust negative pressure unless you have received technical training.
What Determines UV Printhead Life?
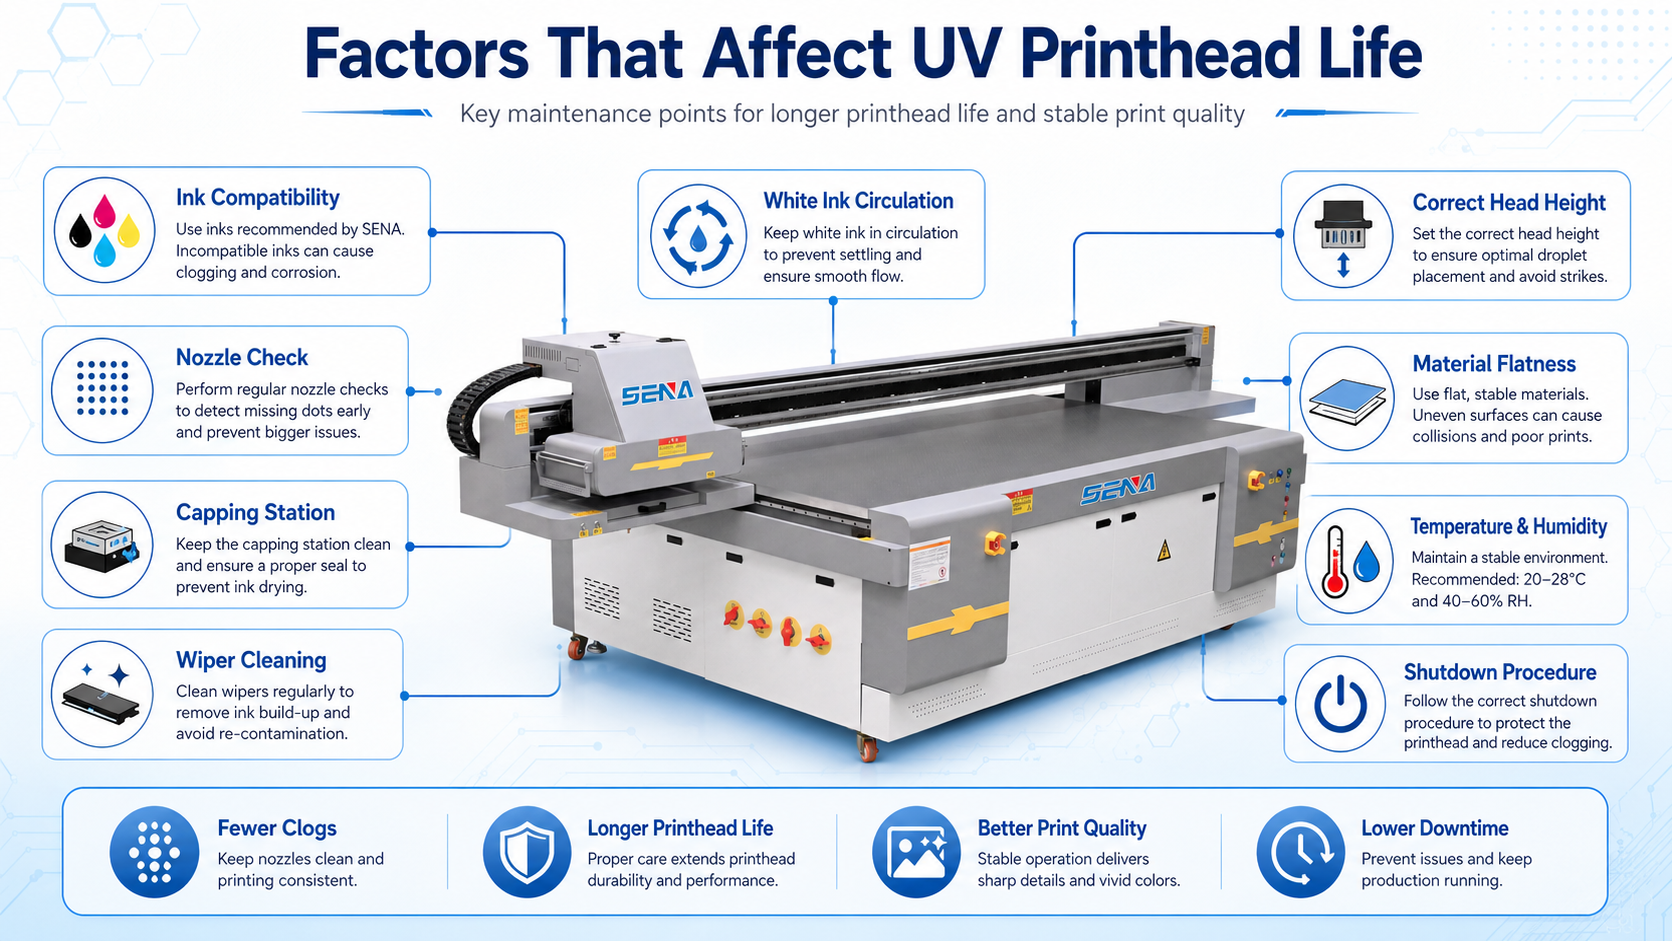
There is no universal operating period that applies to every UV printhead. Two printers using the same printhead model can have very different maintenance results because of differences in ink, production volume, material handling, room conditions and operator habits.
Ink Compatibility and Ink Condition
UV ink must be compatible with the printhead, ink-supply system, filters, dampers, tubes and curing configuration. Two products may both be described as UV ink but still have different viscosity, surface tension, pigment concentration and chemical composition.
Mixing unidentified inks can cause sediment, thickening, unstable jetting or blocked filters. Before changing ink brands, ask the printer or ink supplier whether the existing ink must be removed and whether a controlled flushing procedure is required.
Operators should record the ink brand, batch number, opening date and expiration date. Ink should be stored according to the supplier’s temperature and light-protection requirements.
Printing Frequency and Idle Time
Regular printing can help keep ink moving through the system, but continuous production also increases ink mist, maintenance-station contamination and the risk of material collisions. Long idle periods create a different risk because ink can remain stationary and the nozzle surface may lose proper moisture protection.
The correct power and standby procedure depends on the machine. Some printers require power for automatic circulation or maintenance, while others use a different shutdown method. Do not disconnect the main power without confirming the instructions for your model.
Cleaning Method and Frequency
Insufficient maintenance may allow contamination to remain around the cap and wiper. Excessive cleaning wastes ink and may hide the real cause of a recurring problem.
Every cleaning action should begin and end with a nozzle test. Without a before-and-after comparison, the operator cannot confirm whether the cleaning improved the affected channel.
Printhead Height and Material Flatness
A printhead may be damaged immediately if it contacts a raised material edge, fixture, positioning block or cured ink deposit. The risk increases when printing on warped boards, irregular products or materials that are not held securely by the vacuum platform.
Excessive printhead height can also reduce print quality. A large gap may increase ink mist, reduce edge definition and make small text less clear. The goal is to use a safe height that remains suitable for the material and machine.
Temperature, Humidity, Dust and Static Electricity
Room conditions affect ink behavior, material stability and contamination around the printer. Dust can enter the capping area or attach to the nozzle surface. Static electricity can disturb droplet placement and attract airborne particles.
Do not cut, grind or polish dusty materials beside the printer. Clean the material before loading it and keep ventilation openings unobstructed.
Ricoh vs. Epson UV Printhead Maintenance
Ricoh and Epson printheads are both widely used in UV printing equipment, but the maintenance priorities may differ according to the printhead model and the design of the complete ink system. The printer manufacturer—not the printhead name alone—determines the actual operating and cleaning procedure.
| Maintenance Area | Ricoh Printheads | Epson Printheads |
|---|---|---|
| Typical use | Often used in industrial and high-production UV printers | Used in desktop, medium-size and production UV printers |
| Ink circulation | Certain printhead and machine configurations support ink circulation near the nozzle area | Circulation depends mainly on the printer’s ink-system design and configuration |
| Main checks | Ink pressure, circulation, filters, ink compatibility and material clearance | Nozzle condition, cap sealing, wiper condition, ink supply and material clearance |
| Cleaning strategy | Follow the machine-specific pressure and ink-system procedure | Start with a nozzle check and the recommended cleaning level |
| Common risks | Unstable pressure, poor circulation, incompatible ink and head strikes | Poor capping, dirty wiper, unnecessary cleaning, incompatible ink and head strikes |
Maintenance Priorities for Ricoh Printheads
Ricoh printheads are frequently installed in industrial flatbed printers designed for longer production cycles. Depending on the printhead and machine design, the system may use ink circulation, controlled negative pressure, separate filters and larger ink-supply components.
Operators should monitor circulation and return flow, visible air bubbles, filter condition, pressure alarms and white ink stability. A circulation pump making noise does not always prove that the ink is moving correctly. The return tube and nozzle-test result must also be checked.
Maintenance Priorities for Epson Printheads
Epson printhead maintenance commonly begins with a nozzle check. If the pattern contains missing or deflected nozzles, the operator should use the cleaning level recommended by the printer manufacturer and then print another nozzle test.
The capping station and wiper require particular attention. If the cap does not seal correctly, the cleaning system may not create sufficient suction and the nozzle surface may not remain properly protected during idle periods.
What Both Printhead Types Have in Common
Both require compatible ink, correct capping, stable ink supply, clean maintenance components, suitable printhead height and secure materials. Neither Ricoh nor Epson printheads are protected from physical damage caused by warped boards or incorrect fixtures.
10 Essential UV Printhead Maintenance Practices
1. Use Compatible UV Ink from a Reliable Supplier
Ink should be selected according to the printhead model and complete machine configuration. Do not choose ink only by price or color.
When changing ink brands, request a written conversion procedure. Adding new ink directly to an existing system may create compatibility problems even when both products appear normal separately.
2. Print a Nozzle Check Before Important Production
A nozzle test is the fastest way to understand printhead condition. Perform one before expensive batches, after a long idle period and whenever the print shows lines, missing colors or unstable white coverage.
Save photographs of the pattern. A maintenance history can show whether the same channel is repeatedly affected or whether the problem changes position after cleaning.
3. Keep the Capping Station Clean and Properly Sealed
The cap top helps draw ink during cleaning and protects the nozzle surface when the carriage is parked. Dried ink, dust or fibers around the cap edge may create a sealing gap.
Clean the cap using the approved maintenance position, cleaning stick and liquid. Do not push debris into the cap opening. Inspect the rubber surface for deformation, swelling, cracks or loss of elasticity.
4. Inspect and Clean the Wiper Correctly
The wiper removes ink residue from the nozzle area during automatic maintenance. A dirty or damaged wiper may spread contamination instead of removing it.
Check both sides of the blade for dried ink, fibers and deformation. Use approved cleaning materials and replace the wiper if it cannot maintain a clean, straight edge.
5. Avoid Unnecessary Powerful Cleaning
Powerful cleaning consumes more ink and is not a universal repair method. It cannot correct a damaged cable, a head strike, a failed pump or a blocked ink-supply component.
Use this sequence:
- Print a nozzle test.
- Identify the affected color or channel.
- Use the recommended normal or targeted cleaning.
- Wait for ink pressure to stabilize.
- Print another nozzle test.
- Inspect the cap, wiper and ink supply if there is no improvement.
- Contact technical support instead of repeatedly running the same cleaning.
6. Maintain Stable White Ink Agitation and Circulation
White ink contains a high concentration of pigment and needs regular movement to reduce settling. Check whether the agitation motor and circulation pump actually operate, and inspect the return tube for stable flow.
Large bubbles, interrupted circulation, unusual noise or rapid changes in white density may indicate a pump, filter, tube, pressure or ink-condition problem.
White ink circulation reduces risk but does not eliminate the need for nozzle tests, capping maintenance and compatible ink.
7. Set the Correct Printhead Height
Check the material thickness before each new job. Do not assume that the previous height setting is safe.
The printhead should have sufficient clearance to avoid contact while remaining close enough for accurate droplet placement. Follow the machine supplier’s recommended range for flat boards and irregular objects.
8. Keep Materials Flat and Secure
Inspect every board for raised edges and warping. Clean the vacuum platform and make sure blocked vacuum holes do not reduce holding strength.
Use fixtures, positioning blocks or additional holding methods for small and irregular products. All fixtures must remain below the printhead path.
9. Control Dust, Temperature, Humidity and Static Electricity
Keep the printing room clean and avoid dusty material processing near the machine. Wipe the material before printing and remove loose particles that could attach to the nozzle area.
Maintain the temperature and humidity range specified by the machine and ink supplier. When static is severe, improve grounding and use an appropriate static-control device.
10. Follow the Correct Shutdown and Holiday Procedure
Normal overnight shutdown and long-term storage are not the same. Before a holiday, confirm whether the printer requires continuous power, automatic circulation, cleaning liquid or a special storage procedure.
Do not switch off the machine while the carriage is outside the capping position. Record the shutdown date and maintenance steps so the restart process can be completed correctly.
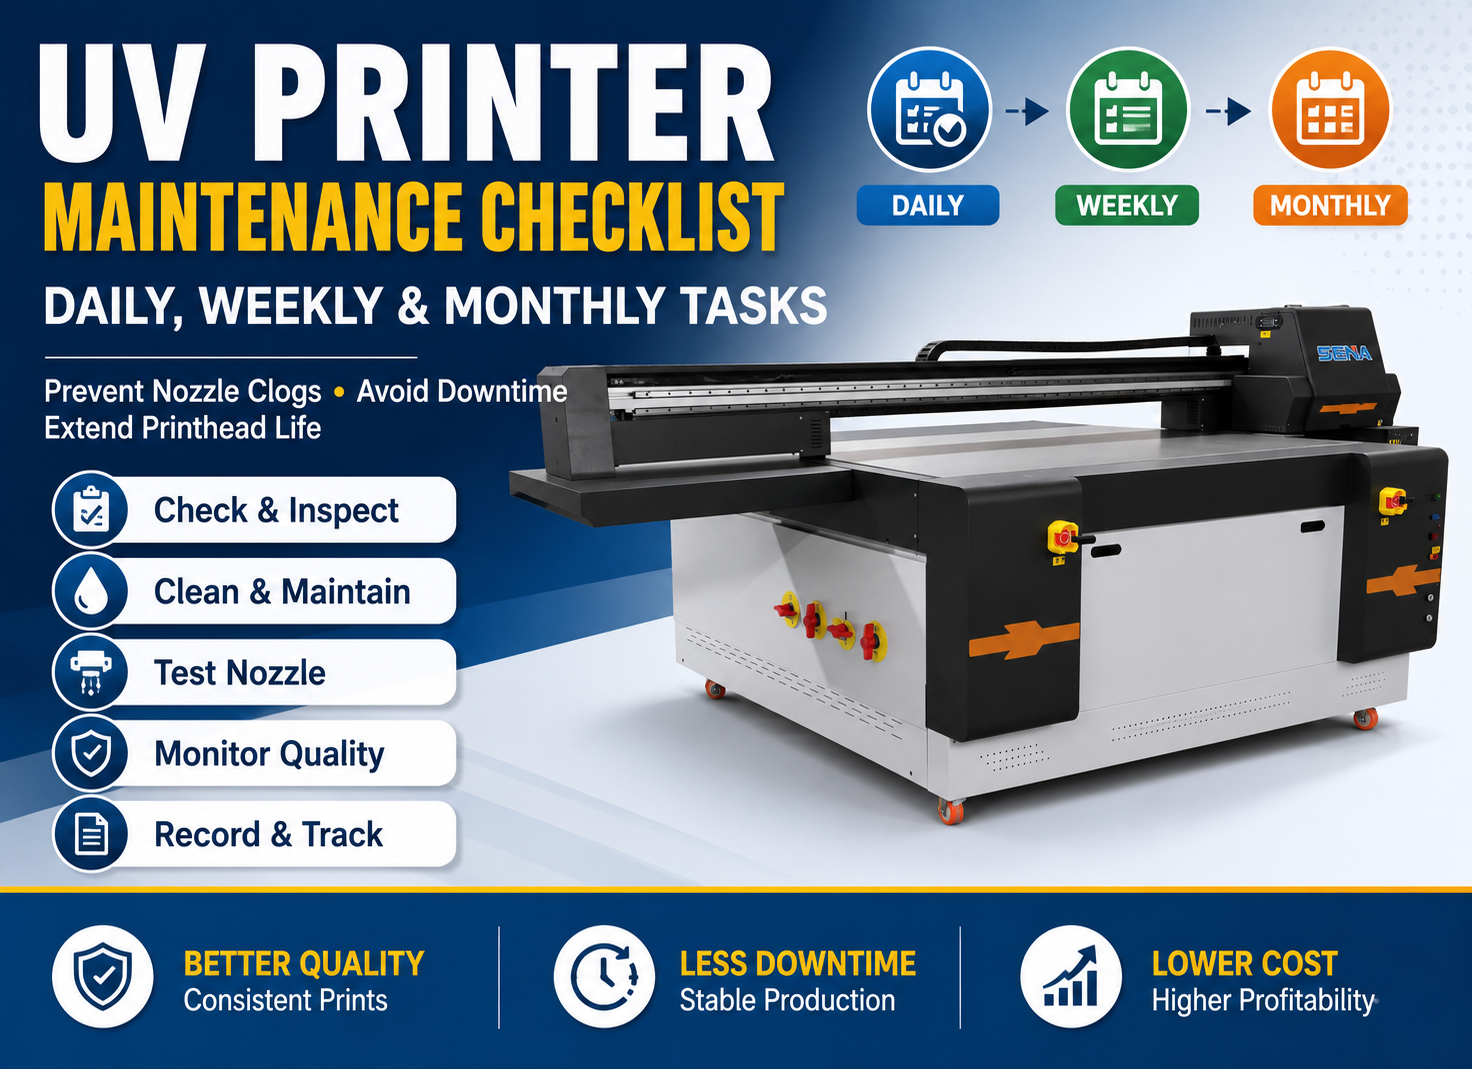
For a complete preventive schedule, see our daily, weekly and monthly UV printer maintenance checklist.
The Correct UV Printhead Cleaning Workflow
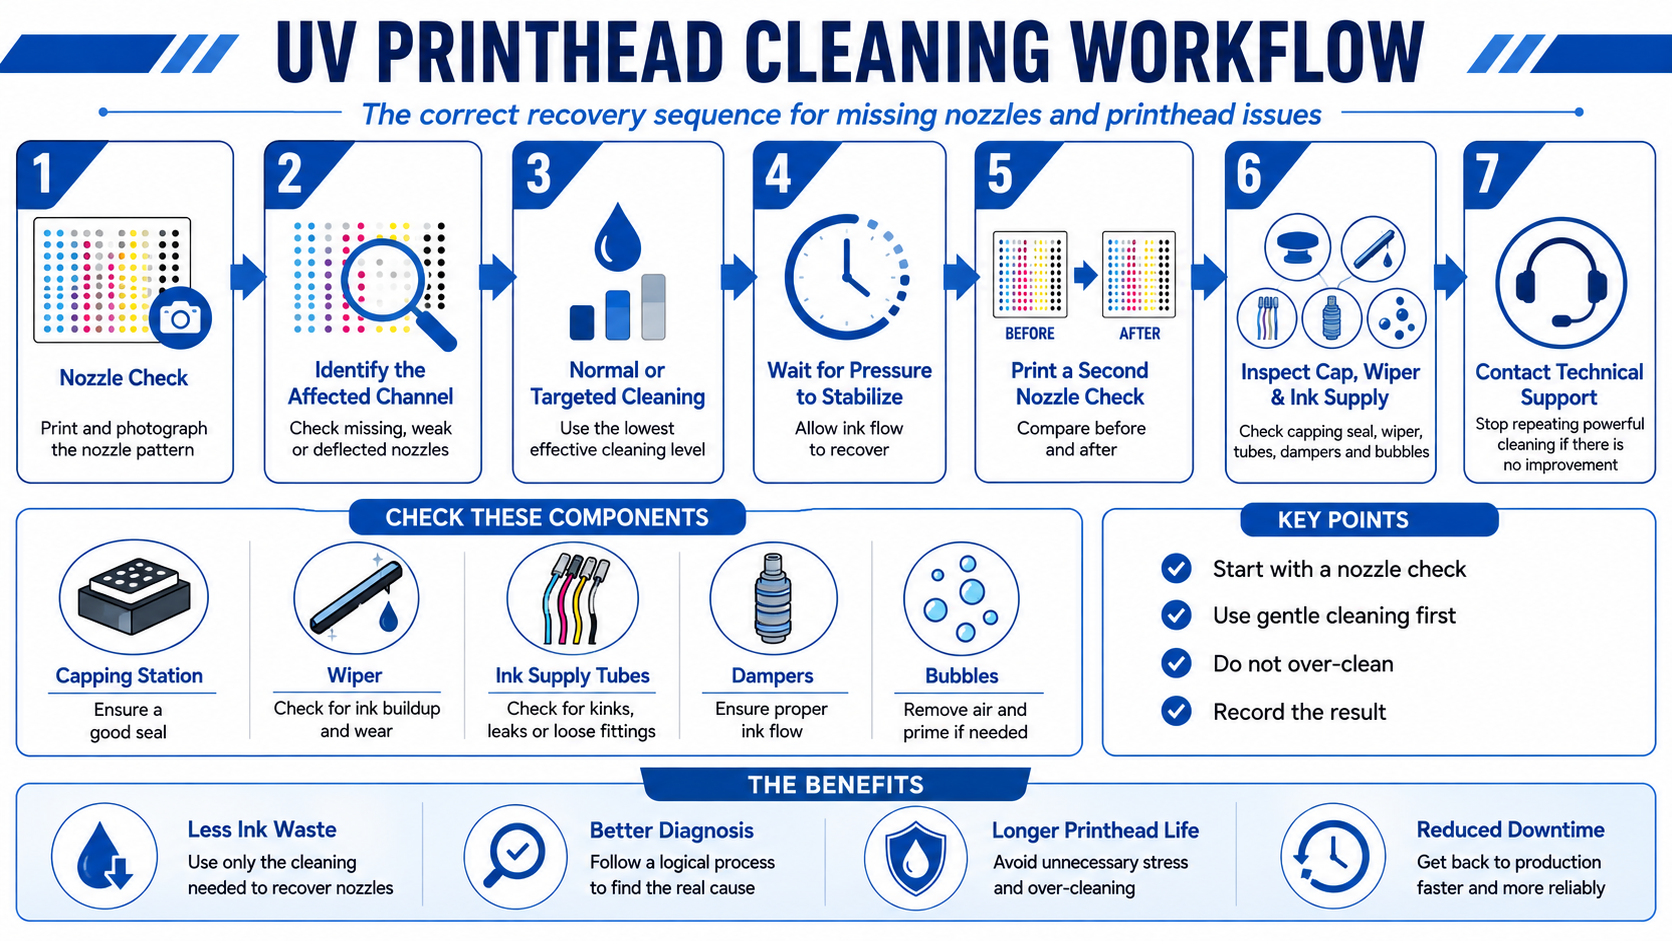
When a nozzle problem appears, the order of troubleshooting is more important than the number of cleaning cycles. A controlled process protects the printhead and helps identify whether the problem is caused by the nozzle surface, maintenance station or ink-supply system.
Step 1: Print and Photograph the Nozzle Test
Look for random gaps, continuous missing sections, a complete missing color, weak patterns or deflected lines. Photograph the result before taking further action.
Step 2: Use the Lowest Effective Cleaning Level
Select normal or targeted cleaning when available. Clean only the affected channel if the printer supports channel selection.
Do not begin with the strongest option unless the manufacturer specifically recommends it for the observed condition.
Step 3: Wait and Print a Second Nozzle Test
Allow time for the ink pressure and flow to stabilize. Print another test under the same settings and compare both patterns.
Possible results include:
- Clear improvement: Continue with the approved recovery process if necessary.
- No change: Inspect the cap, wiper and ink-supply system.
- Temporary recovery: Check for air leaks, unstable pressure or poor cap sealing.
- Different nozzles missing each time: Check ink flow, bubbles and maintenance-station condition.
Step 4: Inspect the Supporting System
Check the cap edge, wiper, visible ink tubes, dampers, filters, white ink circulation and error messages. Look for leakage, large bubbles, empty dampers or interrupted ink flow.
Do not disconnect parts simply to inspect them. Send clear photos to technical support when internal inspection is required.
Step 5: Stop Repeating the Same Action
If several approved cleaning attempts produce no meaningful change, stop. Continuing the same process consumes ink and delays proper diagnosis.
Prepare the nozzle tests, cleaning record, error code, ink-line photos and a short video of the problem for the technician.
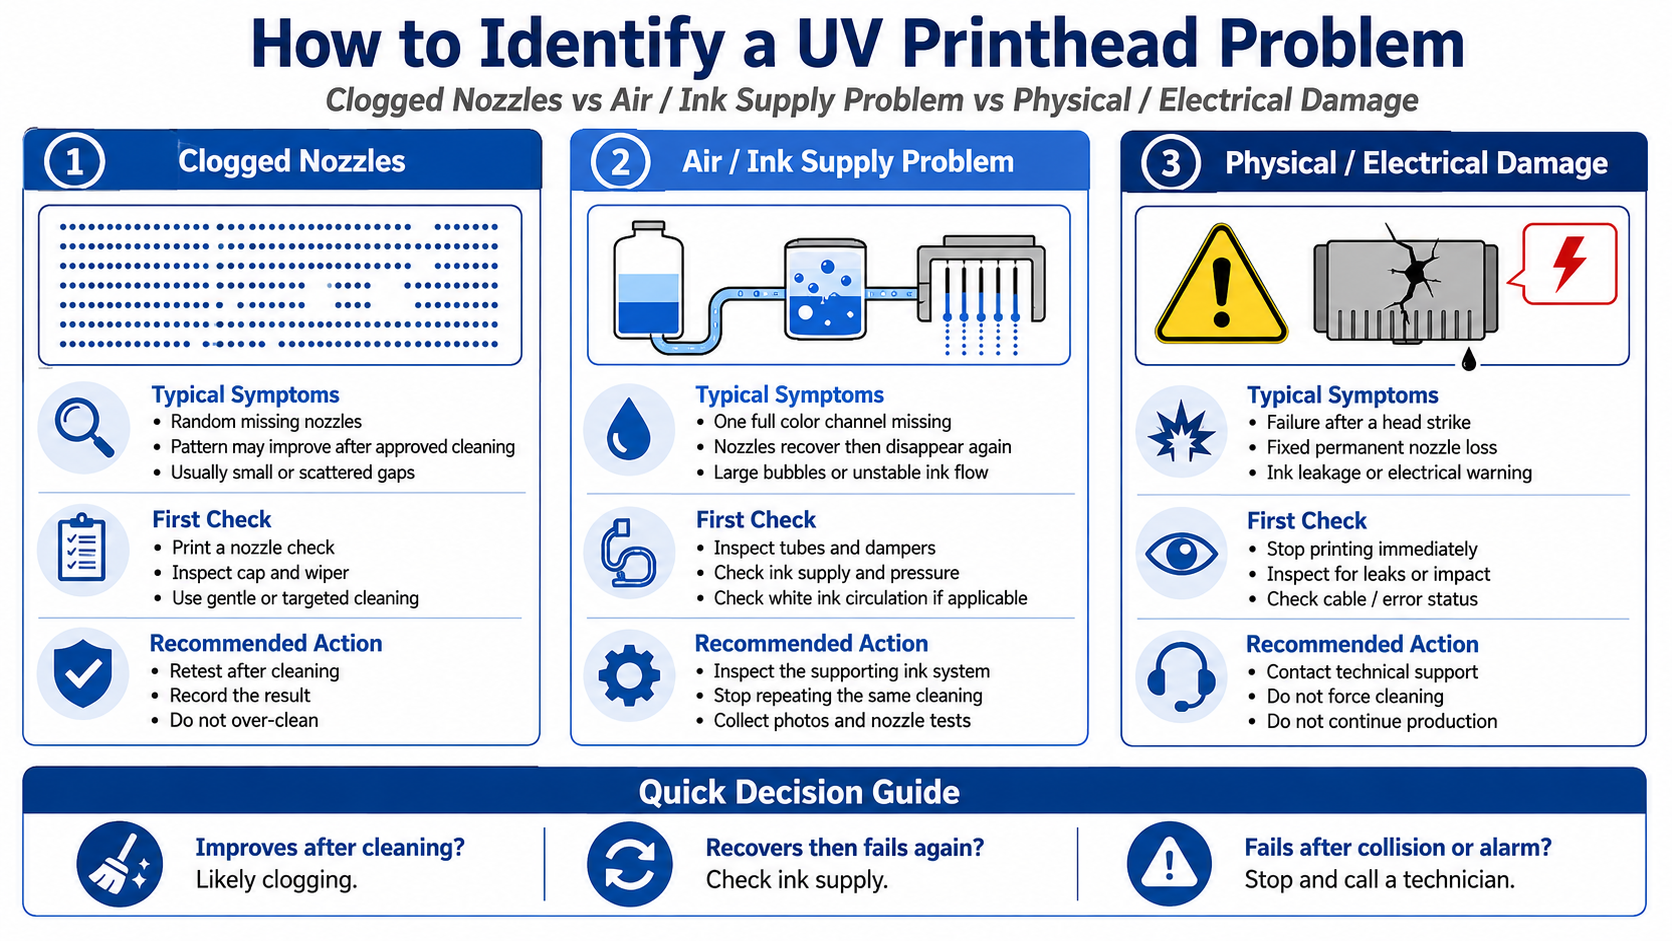
Is the Printhead Clogged, Air-Locked or Damaged?
Not every missing nozzle is a clogged printhead. A similar print defect can be caused by air entering the system, interrupted ink supply, poor cap sealing, pressure instability, physical damage or an electrical fault.
| Symptom | Possible Cause | First Check | Recommended Action |
|---|---|---|---|
| A few random missing nozzles | Light contamination or temporary drying | Nozzle test, cap and wiper | Perform approved normal cleaning and retest |
| One complete color is missing | Ink interruption, air, damper, pressure or electrical issue | Ink line, damper, error status and cable area | Stop repeated cleaning and contact technical support |
| Nozzles recover and disappear again | Air leak, unstable pressure or poor cap seal | Tubes, cap, damper and supply stability | Inspect the supporting ink system |
| Persistent deflected nozzles | Dried residue or nozzle damage | Before-and-after nozzle tests | Use approved recovery and request technician review |
| Ink drips from the printhead | Pressure, valve, cap or ink-supply fault | Pressure alarm, tubes and leakage | Stop printing immediately |
| Large nozzle loss after a collision | Physical or electrical damage | Material height, nozzle test and leakage | Stop operation and contact a technician |
Signs of a Recoverable Nozzle Problem
- A small number of random nozzles are missing.
- The pattern gradually improves after approved cleaning.
- Cleaning the cap and wiper restores suction.
- The problem appears after a short idle period and improves during controlled recovery.
- The missing positions change between tests.
Signs of an Air or Ink-Supply Problem
- A complete color channel disappears.
- Large bubbles are visible in the ink tube.
- The channel recovers briefly after cleaning and then fails again.
- The damper does not refill correctly.
- A pump or pressure alarm appears.
Signs of Physical or Electrical Damage
- Large nozzle loss appears immediately after a head strike.
- Ink is visible near cables or electrical connectors.
- The printhead becomes abnormally hot.
- One channel remains completely inactive.
- A drive-voltage, board or communication alarm appears.
UV Printhead Maintenance During Long Idle Periods
Idle for One to Three Days
Complete normal end-of-day maintenance and confirm that the printhead returns to the correct capping position. Keep the required automatic maintenance, agitation or circulation functions enabled according to the machine instructions.
Print a nozzle test before restarting production.
Idle for One to Two Weeks
Contact the supplier before the shutdown. Depending on the machine, preparation may include checking cleaning liquid, protecting the cap, managing white ink and using a storage or keeping-maintenance function.
Save the RIP settings and important machine parameters. Record the date and all maintenance steps completed before shutdown.
Long-Term Storage
Do not copy a flushing procedure from a different printer model. Incorrect cleaning liquid, pressure or tube handling can damage the ink system.
Never leave the printhead exposed to air. Restart the printer only after following the supplier’s recovery procedure and confirming that the ink, circulation and nozzle condition are stable.
Common UV Printhead Maintenance Mistakes
Cleaning Without a Nozzle Test
Without a nozzle test, the operator cannot identify the affected channel or measure the result. This often leads to unnecessary cleaning and wasted ink.
Touching the Nozzle Plate
Do not touch the nozzle surface with fingers, ordinary tissue, hard tools or unapproved cotton swabs. Direct contact may scratch the surface or introduce contamination.
Using Alcohol or an Unknown Solvent
Different printheads, cap tops, wipers and seals use different materials. A solvent that appears safe on metal may damage rubber, coatings or adhesives. Use only the maintenance liquid approved by the machine and ink supplier.
Forcing Ink Through the Printhead
Excessive manual pressure may damage internal seals, cause leakage or push ink into electrical areas. Ink filling and flushing should follow the machine-specific pressure procedure.
Ignoring a Small Head Strike
Even when the printer continues working, stop and inspect it after contact with a material. Check the nozzle pattern, printhead area, material height and platform before continuing.
Replacing the Printhead Before Checking Supporting Parts
A new printhead will not solve a damaged cap, blocked filter, air leak, failed pump or unstable pressure. Diagnose the complete system before approving replacement.
When Should You Replace a UV Printhead?
Printhead replacement should be based on print quality, recoverability, production requirements and the condition of the supporting ink system—not only the age of the printhead.
Problems That May Still Be Recoverable
- Poor cap sealing
- A dirty or damaged wiper
- Air in the ink line
- A blocked filter or unstable damper
- White ink sedimentation
- Temporary nozzle loss after an idle period
- Incorrect cleaning or maintenance settings
Problems That May Require Replacement
- Serious physical impact or a damaged nozzle plate
- Internal ink leakage
- Permanent electrical failure
- Large, fixed nozzle loss that does not respond to approved recovery
- Print quality that no longer meets production requirements
Compare Replacement Cost with Production Loss
Consider ink used for repeated cleaning, rejected products, operator time, technician cost and lost production. A partially working printhead may still be acceptable for some applications but unsuitable for small text, gradients or high-value orders.
Printhead replacement is also part of the UV printer total cost of ownership. Correct maintenance helps reduce premature replacement, but it cannot restore a physically or electrically damaged printhead.
Frequently Asked Questions About UV Printhead Maintenance
How long does a UV printhead last?
There is no fixed lifespan that applies to every UV printhead. Actual service life depends on ink compatibility, production volume, maintenance quality, room conditions, material handling and whether the printhead experiences physical collisions.
Should I clean a UV printhead every day?
Perform a nozzle check regularly, but do not automatically run strong cleaning every day. Clean the printhead only when the test pattern or print quality indicates that maintenance is necessary.
Can Ricoh and Epson printheads use the same UV ink?
Not automatically. UV ink must match the printhead, viscosity range, supply pressure, filters and curing system. Confirm compatibility before changing ink.
Why do nozzles recover and then disappear again?
This pattern may indicate air entering the ink line, poor cap sealing, unstable negative pressure, a damper problem, blocked filtration or interrupted white ink circulation.
Can I wipe the nozzle surface directly?
Do not wipe the nozzle plate unless the machine manufacturer provides a specific approved procedure. Routine maintenance should normally focus on the cap, wiper and surrounding accessible areas.
What should I do after a head strike?
Stop printing, remove the collision risk and print a nozzle test. Inspect for ink leakage and photograph the affected area. Contact technical support if there is a large or persistent nozzle loss.
Does white ink circulation prevent all clogging?
No. Circulation helps reduce pigment settling but cannot replace compatible ink, proper capping, nozzle checks and maintenance-station cleaning.
Why is one complete color channel missing?
A complete missing channel may involve interrupted ink supply, air, a damper or filter problem, pressure instability, a cable connection or an electrical fault. Repeated cleaning is unlikely to solve every possible cause.
When should I contact a technician?
Contact a technician when an entire channel disappears, ink drips from the printhead, a head strike causes large nozzle loss, electrical alarms appear or approved basic cleaning produces no improvement.
Final Recommendations for Longer UV Printhead Life
Reliable UV printhead maintenance is based on inspection, controlled action and accurate records. Use compatible ink, print nozzle checks before important work, keep the cap and wiper clean, maintain white ink circulation and check material flatness before every job.
Use the least aggressive effective cleaning method and compare the nozzle pattern before and after maintenance. When a problem does not improve, inspect the supporting ink system instead of repeatedly cleaning the printhead.
Most importantly, stop the printer after a head strike, ink leak or electrical warning. Fast, correct action can prevent a small problem from becoming an expensive printhead or control-system failure.
Need Help with a Ricoh or Epson UV Printhead?
Send us your printer model, printhead type, ink configuration and nozzle-test photo. Our technical team can help you identify the correct inspection and maintenance steps.
Related UV Printer Guides
-
UV Printer Maintenance Checklist: Daily, Weekly and Monthly Tasks
-
UV Printer Total Cost of Ownership
-
7 Hidden Factors That Drive UV Printing Cost
-
How to Choose the Right UV Printer and Printhead Configuration
-
UV Printer White Ink Circulation Troubleshooting
-
UV Printer Banding Causes and Solutions
-
UV Printer Remote Troubleshooting Guide