

 French
  English
  Arabic
  German
  Spanish
  Turkish
  Italian
  Russian
  Persian
  Bengali
  Hebrew
  Persian (Afghanistan)
  Scottish Gaelic
  Panjabi
  Croatian
  Slovenian
  Greek
Greek  Afrikaans
  Czech
Czech  Korean
  Japanese
  Portuguese




















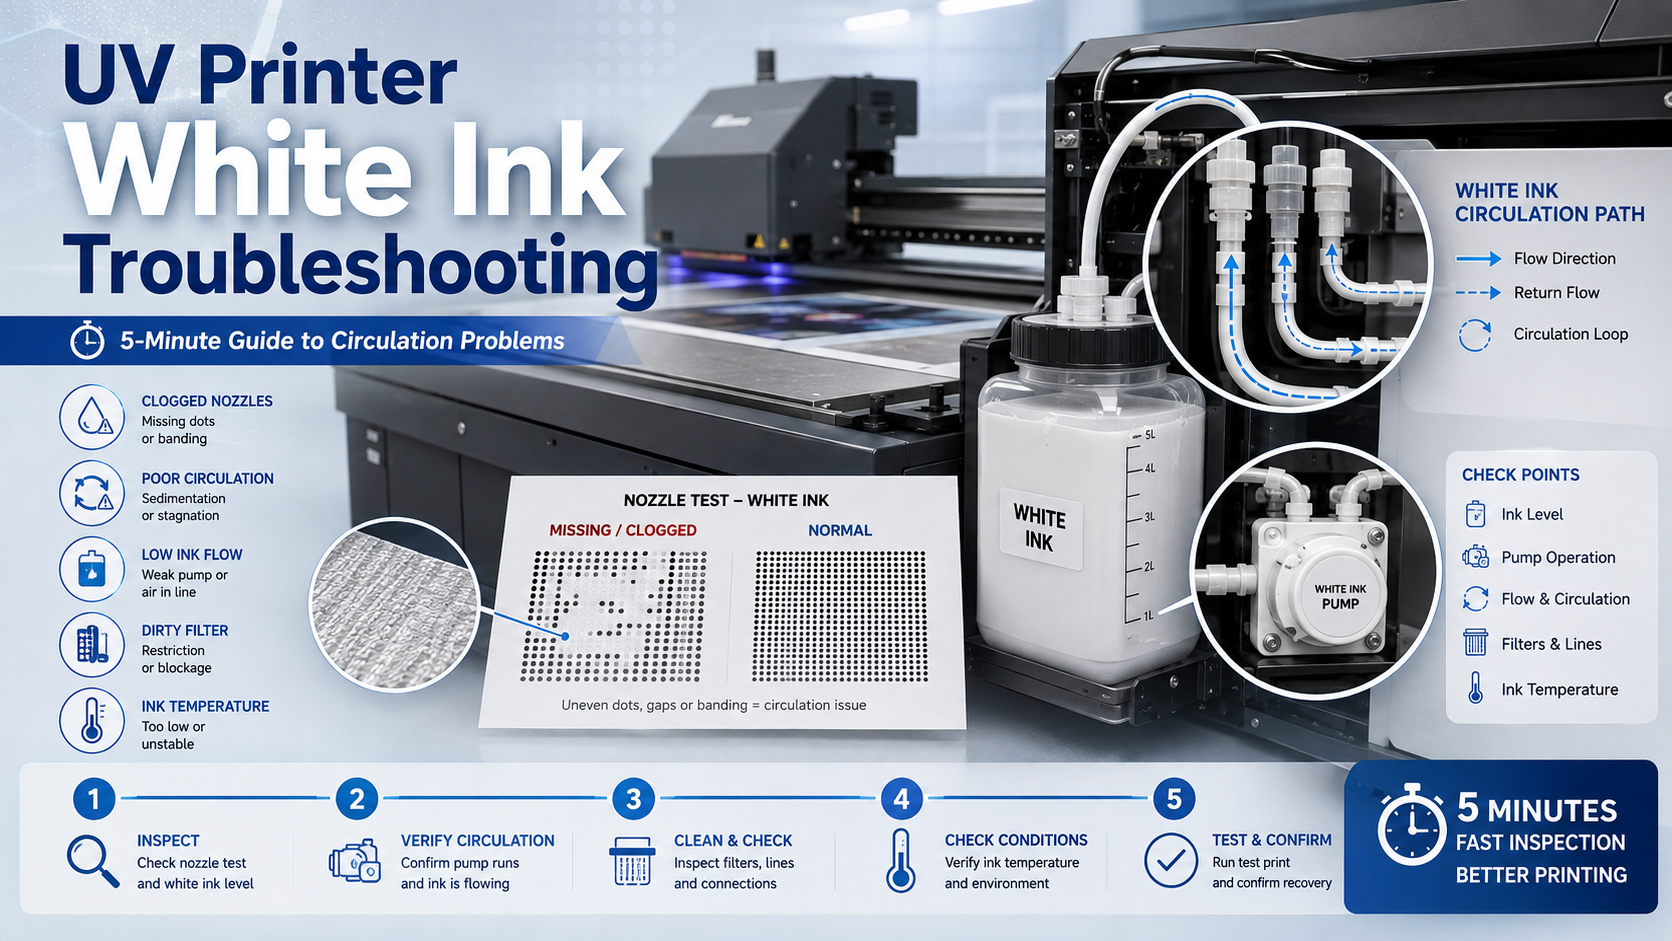
UV Printer White Ink Troubleshooting: A 5-Minute Guide to Circulation Problems
White ink not printing, appearing weak, or changing density during production does not always mean that the printhead is damaged. In many cases, the problem is related to white pigment settling, poor circulation, air entering the ink line, a restricted filter or damper, incorrect ink pressure, or a poorly sealed cleaning station.
Ce UV printer white ink troubleshooting guide provides a five-minute, non-invasive inspection process. It is designed to help operators identify the most likely problem area before replacing parts or requesting technical support.
The procedure does not require removing the printhead, disconnecting ink tubes, adjusting negative pressure, or opening electrical components. Its purpose is to answer one practical question:
Is the white ink problem more likely to be in the ink tank, circulation system, supply line, pressure system, cleaning station, or printhead channel?
Important safety notice: UV printers use different white ink supply systems, printheads, pumps, dampers, valves, and pressure settings. Always follow the maintenance instructions provided by your printer manufacturer. Do not remove dampers, disconnect printhead tubes, change negative pressure values, or test electrical components unless instructed by a qualified technician.
Quick Answer: Where Is the White Ink Problem Likely Located?
Start by matching the visible symptom with the most likely inspection area. This table does not provide a final diagnosis, but it can help you avoid unnecessary cleaning or premature printhead replacement.
| Visible Symptom | Likely Problem Area | First Safe Check |
|---|---|---|
| White ink is weak or semi-transparent | Pigment settling or poor circulation | Check the tank, agitator and circulation flow |
| White ink prints after cleaning but disappears again | Air leak, unstable supply, pressure or cap-top sealing | Inspect bubbles and compare two nozzle tests |
| One complete white channel is missing | Damper, valve, ink supply, cable or head channel | Check visible ink supply and contact support |
| Continuous bubbles are visible in a tube | Air entering the white ink path | Inspect joints, leakage and ink level |
| Pump runs but ink does not return | Pump, valve, filter or return-line restriction | Observe the return tube without disconnecting it |
| White ink drips from the printhead | Pressure, damper, valve or ink-control problem | Stop printing and contact a technician |
Why White Ink Requires More Maintenance Than CMYK Ink
White Ink Contains a High Pigment Load
UV white ink contains a high concentration of solid pigment. This pigment provides the opacity required for printing on transparent, dark or colored materials. However, the heavier pigment can settle when the printer remains idle or when agitation and circulation are insufficient.
As pigment settles, the upper part of the ink may become less concentrated while denser material collects near the bottom of the tank or inside parts of the supply path. This can cause weak white coverage, inconsistent density and restricted ink flow.
Agitation and Circulation Perform Different Jobs
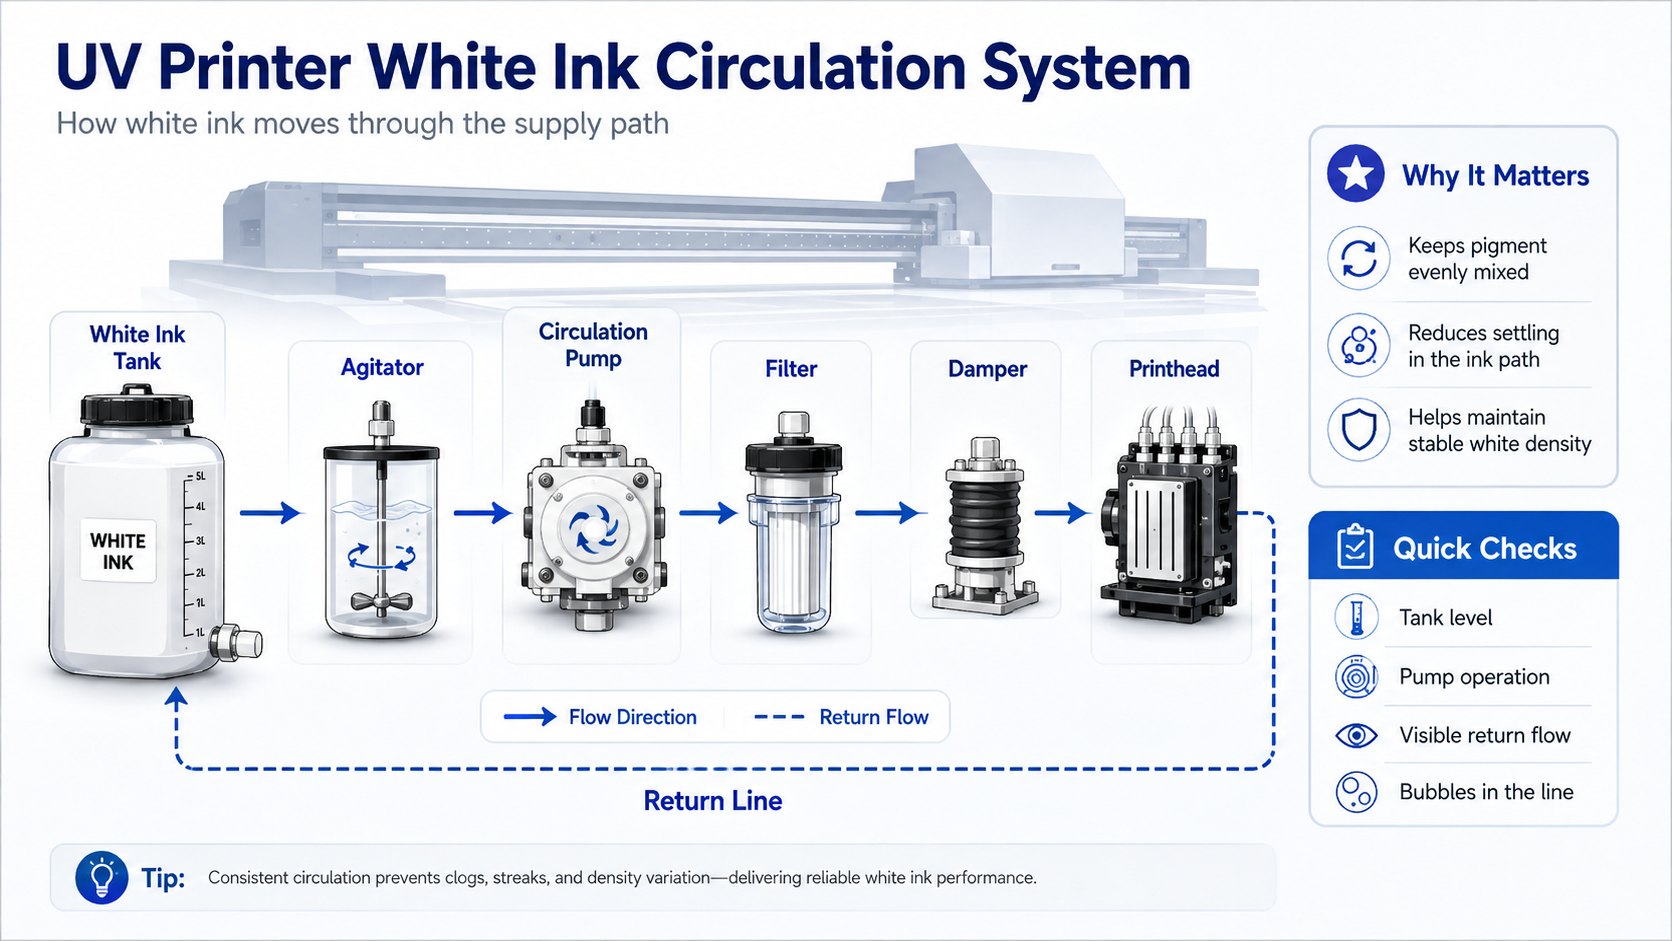
The agitation system normally keeps ink inside the main white ink tank mixed. The circulation system moves ink through part of the supply path so pigment is less likely to remain stationary inside tubes, manifolds or return lines.
These functions should not be confused with printhead cleaning. A cleaning cycle draws or pushes ink through the nozzle area, while agitation and circulation mainly help maintain ink consistency and flow.
A working circulation pump does not guarantee that every white ink component is clear. Filters, dampers, valves and narrow tubes can still become restricted. Circulation also cannot fully prevent nozzle drying if the cap top does not seal correctly or the printer remains unused for an extended period.
Common Symptoms of UV Printer White Ink Problems
White Ink Does Not Print
A completely missing white layer may appear as an empty white channel in the nozzle test or as no white ink on the material. Possible causes include an empty or poorly mixed tank, restricted ink flow, a closed valve, air in the line, a failed damper, unstable pressure or an electrical problem.
White Ink Is Weak or Semi-Transparent
Weak white ink often appears when the pigment concentration is uneven. The print may look acceptable at the beginning of a job and gradually become more transparent. This symptom can also be caused by missing nozzles, incorrect print settings, insufficient white ink layers or ink that is no longer within the recommended storage period.
White Density Changes During the Same Job
When white density changes across one production run, check whether the circulation is stable and whether bubbles are moving through the ink line. Intermittent supply can create sections with different opacity even when the RIP settings remain unchanged.
White Nozzles Disappear After the Printer Is Idle
If the nozzle test is good after cleaning but becomes incomplete after several hours or overnight, inspect the cap top, cleaning station, circulation schedule and visible ink lines. A poor cap-top seal may allow the nozzle surface to dry, while an air leak or unstable supply may cause ink to move away from the damper.
White Ink Prints Intermittently
White ink that starts and stops during printing is often associated with bubbles, restricted flow, unstable pressure or a partially blocked filter or damper. Repeated cleaning may produce temporary improvement without removing the underlying cause.
White Ink Drips from the Printhead
Dripping or ink collecting heavily on the nozzle plate may indicate incorrect pressure, an overfilled or damaged damper, a valve problem or uncontrolled ink supply. Stop production before the ink reaches cables, sensors or electrical components.
The 5-Minute UV Printer White Ink Troubleshooting Check
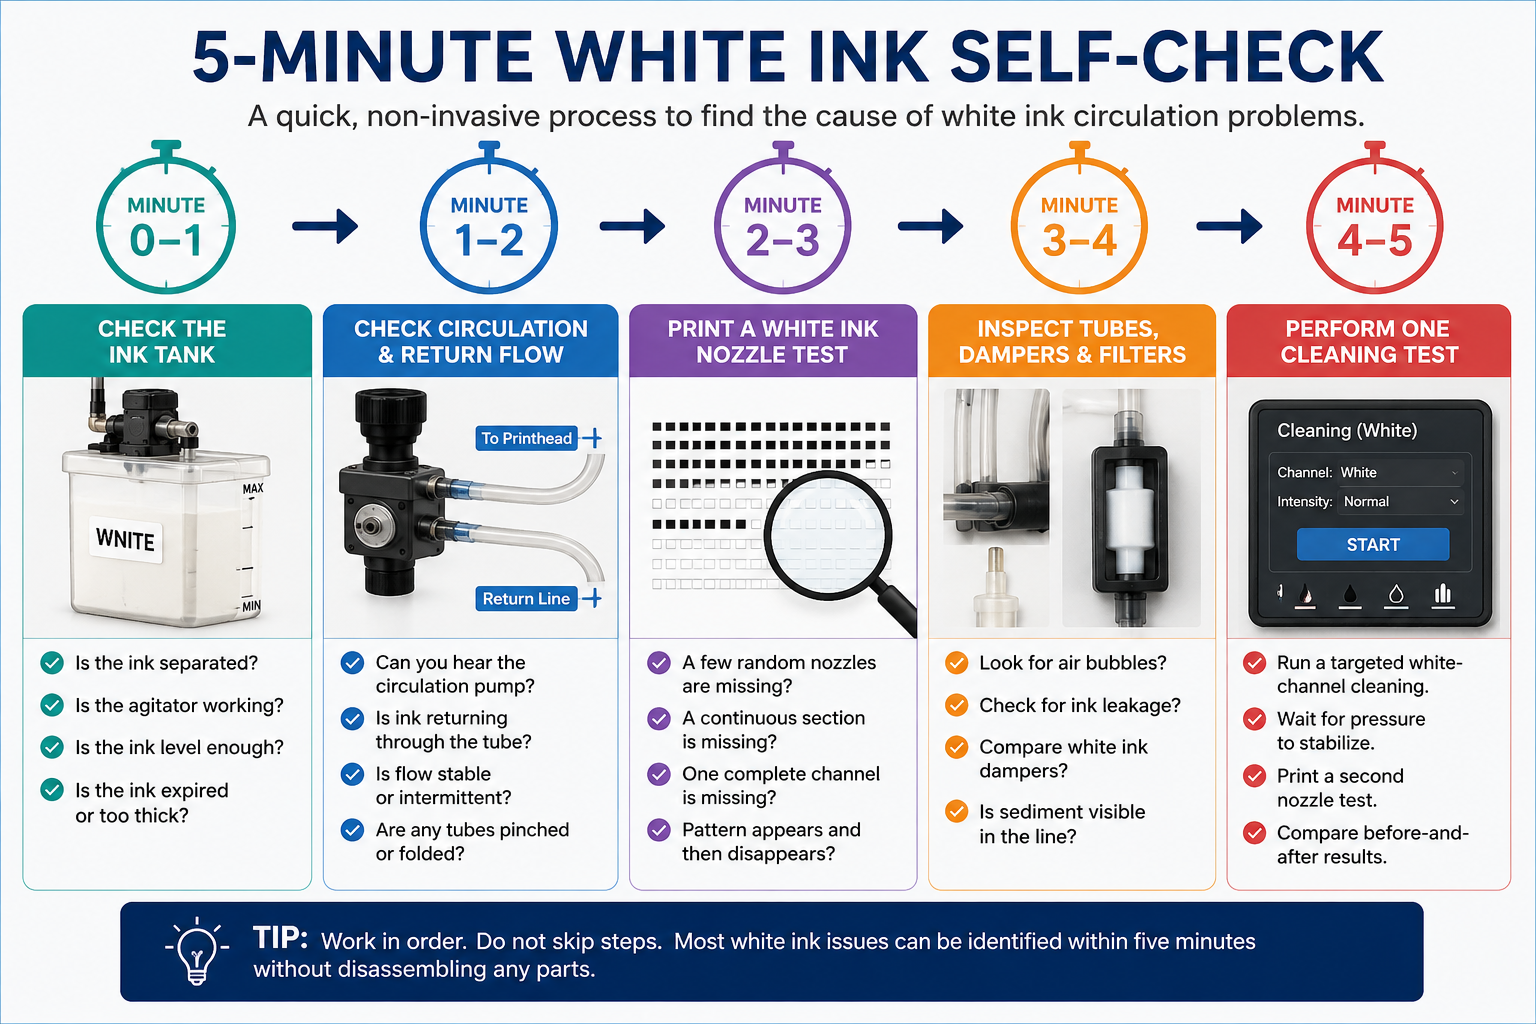
Complete the following steps in order. Take photos of the first nozzle test, visible ink lines and any abnormal condition. These records help a technician identify patterns without asking the operator to repeat unnecessary procedures.
Minute 0–1: Check the White Ink Tank and Agitator
Open only the access area that the operator is permitted to inspect. Do not open sealed electrical covers.
- Confirm that the white ink level is above the machine’s minimum operating level.
- Check whether the ink is visibly separated into different layers.
- Observe whether the agitator is moving normally.
- Look for thick deposits, lumps or unusually heavy sediment.
- Check the ink production date, expiry information and storage conditions.
- Confirm that the tank cap, suction tube and level sensor are installed correctly.
If the ink is slightly separated, use the printer’s normal agitation or circulation function according to the machine manual. Do not add cleaning liquid, thinner or a different white ink to restore fluidity.
If the ink contains hard deposits, large particles or abnormal thickening, stop using it. Circulating badly degraded ink may move contamination farther into filters, dampers and printhead channels.
Minute 1–2: Check Circulation and Return Flow
Activate the normal white ink circulation function, or observe the system during its scheduled circulation cycle.
- Listen for the normal sound of the circulation pump.
- Lightly touch an accessible pump housing only when permitted and safe.
- Observe whether ink is moving through a transparent return tube.
- Check whether the flow is steady, pulsing or completely absent.
- Look for tubes that are folded, pinched, flattened or tightly bent.
- Check for large bubbles that repeatedly enter the same line.
- Look for visible leakage around tube joints, filters and connectors.
A pump sound only confirms that the motor is receiving power. It does not confirm that the pump is moving enough ink. A worn pump, blocked filter, closed valve or restricted tube may still produce noise without creating normal return flow.
Do not disconnect a tube to check whether ink is flowing. This can introduce air, disturb pressure and contaminate the working area.
Minute 2–3: Print a White Ink Nozzle Test
Print the standard nozzle test recommended for your printer. Use clean material and make sure the white section is visible. On transparent media, place a dark sheet beneath the test if necessary.
Compare the pattern with the following conditions:
- A few random nozzles are missing: This may indicate mild nozzle blockage or contamination on the nozzle surface.
- A continuous group is missing: This may indicate restricted supply, a partially empty damper, air in the line or a blocked printhead channel.
- One complete white channel is missing: The problem may involve the damper, valve, ink supply, cable, control board or printhead channel.
- The pattern appears and then disappears: Ink may be entering the head temporarily but not being supplied consistently.
- The pattern is complete but white density is weak: Check pigment mixing, circulation and print settings before assuming nozzle failure.
Take a clear photo of the test. Include the full pattern rather than only the missing section.
Minute 3–4: Inspect Tubes, Dampers and Visible Filters
Use a flashlight to inspect visible components without removing them.
- Look for continuous air bubbles inside white ink tubes.
- Check whether one white ink damper appears much emptier than the others.
- Look for ink leakage around connectors or damper edges.
- Check whether visible tubes contain heavy sediment or unusual discoloration.
- Compare the shape and ink level of similar dampers.
- Look for a collapsed tube caused by excessive suction or a blocked upstream path.
Small bubbles that move occasionally may not always cause a problem. A repeated stream of bubbles, however, suggests that air may be entering through a loose connection, damaged tube, low ink level or poorly sealed component.
Do not: remove the damper, pull ink with a syringe, force cleaning liquid into the printhead, loosen tube connectors, or touch printhead cables during this inspection.
Minute 4–5: Perform One Controlled Cleaning Test
After completing the visual inspection, perform one normal white-channel cleaning cycle. Use the standard cleaning level recommended for routine nozzle recovery. Do not begin with repeated heavy or power cleaning.
- Save the first nozzle-test photo.
- Run one normal white-channel cleaning cycle.
- Allow the ink supply and pressure to stabilize.
- Print a second nozzle test.
- Compare the two tests carefully.
If the second test improves significantly, the problem may be mild nozzle blockage or temporary nozzle-surface contamination. Continue monitoring before starting production.
If the test improves and then quickly becomes incomplete again, investigate air entry, unstable ink supply, cap-top sealing or pressure control.
If there is no improvement, avoid performing many cleaning cycles in succession. Repeated cleaning consumes white ink, fills the waste tank and may hide the real supply problem.
How to Diagnose the Test Results
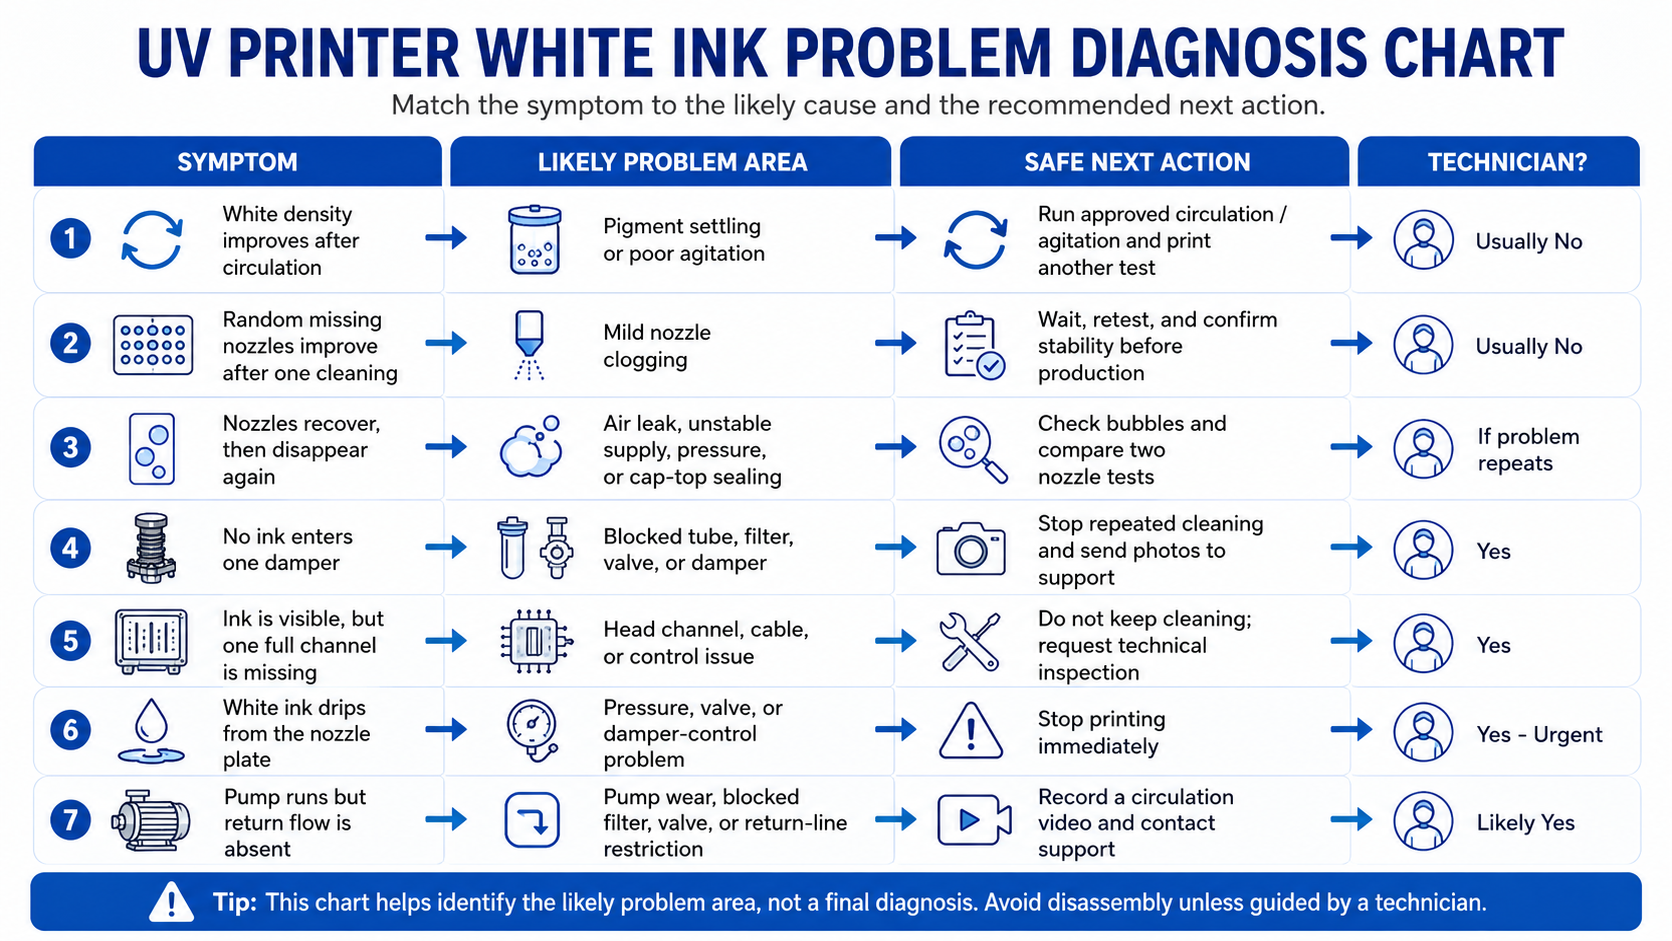
| Test Result | Likely Problem Area | Recommended Next Action |
|---|---|---|
| White density improves after circulation | Pigment settling or insufficient agitation | Continue the approved circulation cycle and print another test |
| Random missing nozzles improve after one cleaning | Mild nozzle blockage | Wait, retest and confirm stability before printing |
| Nozzles recover but disappear again | Air leak, unstable supply, pressure or poor cap sealing | Check visible bubbles and send records to support |
| No ink appears to enter one damper | Blocked tube, filter, valve or damper | Stop repeated cleaning and request technician guidance |
| Ink is visible in the line but a full channel remains missing | Damper outlet, head channel, cable or electrical control | Technician inspection is required |
| White ink drips or floods the nozzle plate | Pressure, valve or damper-control problem | Stop printing immediately |
| Pump runs but return flow is absent | Pump wear, blocked filter, valve or restricted tube | Record a circulation video and contact support |
Seven Common Causes and Recommended Actions
1. White Pigment Sedimentation
Typical signs: weak white density, uneven opacity or improvement after circulation.
Recommended action: run the approved agitation and circulation process. Confirm that the ink is within its storage period. Do not attempt to recover ink containing hard deposits or large particles.
2. Agitator or Circulation Pump Failure
Typical signs: the agitator does not move, the pump is silent, or the pump runs without visible return flow.
Recommended action: check for an error message, confirm that the system is enabled and record a short video. Pump replacement or electrical testing should be completed by a technician.
3. Blocked Filter, Damper or Ink Line
Typical signs: one damper remains underfilled, a continuous nozzle section is missing, or flow becomes weaker over time.
Recommended action: inspect visible lines for sediment and deformation. Do not force ink through the restriction. The filter or damper may require replacement.
4. Air Leakage in the White Ink Path
Typical signs: repeated bubbles, intermittent printing, temporary improvement after cleaning or a damper that repeatedly loses ink.
Recommended action: check the tank level, visible connectors and tubes for leakage. Photograph the bubble pattern so technical support can determine whether it is occasional trapped air or continuous air entry.
5. Incorrect Negative Pressure
Typical signs: ink starvation, disappearing nozzles, dripping, excessive ink on the nozzle plate or unstable damper filling.
Recommended action: do not copy pressure values from another machine. Correct pressure depends on the printer structure, ink system, printhead model and installation conditions. Ask the supplier to verify the setting.
6. Poor Cap-Top Sealing
Typical signs: cleaning has little effect, white nozzles disappear after the printer is idle, or the pump cannot draw ink normally during maintenance.
Recommended action: clean the cap-top edge and surrounding area using the approved method. Check whether the printhead aligns correctly with the cap top. Replace worn components when necessary.
7. Clogged, Damaged or Electrically Inactive Printhead Channel
Typical signs: one complete channel remains missing even though ink reaches the damper, or the failure began after a head strike, cable problem or electrical error.
Recommended action: stop repeated cleaning. A technician should test the ink supply, head cable, channel output and control system before deciding whether the printhead must be replaced.
What the Operator Can Safely Do
Operators can normally complete the following tasks without opening the ink system:
- Check the white ink level and expiry information.
- Observe ink separation and agitator movement.
- Run the approved agitation or circulation function.
- Print and photograph a nozzle test.
- Perform one normal white-channel cleaning cycle.
- Clean the wiper and cap-top area using approved tools.
- Inspect accessible tubes for bubbles, folding and leakage.
- Photograph dampers, error messages and abnormal ink flow.
- Record the ink batch, printer model and time of failure.
For a complete maintenance schedule, read our daily, weekly and monthly UV printer maintenance checklist.
What Should Be Left to a Technician
The following procedures may change pressure, introduce air, damage cables or contaminate the printhead. They should only be completed with professional guidance:
- Adjusting negative pressure or supply pressure.
- Removing dampers or printhead ink tubes.
- Using a syringe to pull ink through the printhead.
- Flushing the complete white ink system.
- Replacing pumps, solenoid valves or pressure sensors.
- Testing printhead cables and control boards.
- Removing or replacing the printhead.
- Changing firmware, pump timing or circulation parameters.
To reduce unnecessary printhead damage, also review our guide on how to extend Ricoh and Epson printhead life.
Stop the Printer Immediately If You See These Signs
Stop printing and disconnect power according to the manufacturer’s emergency procedure when necessary if you observe:
- White ink leaking onto printhead cables, connectors or circuit boards.
- Severe and continuous dripping from the nozzle surface.
- A printhead overheating warning or electrical error.
- An abnormal pump noise, overheating component or burning smell.
- A head strike followed by sudden channel failure.
- Ink spreading inside an electrical cabinet or control area.
Do not continue repeated cleaning when ink is close to electrical components. Preventing secondary electrical damage is more important than immediately restoring nozzle output.
How to Prevent Future White Ink Problems
Follow the Recommended Circulation Schedule
White ink circulation may operate continuously, at scheduled intervals or only during certain machine states. Follow the settings designed for your printer. Do not increase pump speed or circulation time without technical approval.
Do Not Mix Incompatible Inks
Avoid mixing different ink brands, formulations or unconfirmed batches. Even when two products are both described as UV white ink, their viscosity, pigment, additives and curing behavior may be different.
Never add cleaning liquid or thinner directly to the production ink tank unless the ink supplier provides a documented procedure.
Use White Ink Regularly
Printing white ink regularly helps keep the ink path active. When the printer will remain unused, follow the correct short-term or long-term shutdown procedure. Simply switching off the machine may disable scheduled circulation and increase sedimentation risk.
Maintain the Cap Top and Wiper
A dirty or damaged cap top may prevent effective cleaning and allow the nozzle surface to dry. A hardened or damaged wiper can leave residue on the printhead instead of removing it.
Clean these components at the intervals recommended by the manufacturer and replace them when they become deformed, swollen, scratched or unable to seal correctly.
Monitor Filters and Dampers
Filters and dampers are consumable parts. Replacement frequency depends on ink quality, production volume, machine design and maintenance conditions. Do not wait for a complete channel failure before recording changes in ink flow.
Keep Nozzle-Test Records
Save nozzle tests with the date, machine operating hours and cleaning result. A gradual increase in missing nozzles may reveal a developing flow or maintenance problem before production quality becomes unacceptable.
A useful troubleshooting record should include:
- Printer model and printhead model.
- White ink brand, batch and installation date.
- First and second nozzle-test photographs.
- Photos or videos of the tank, tubes and dampers.
- Whether circulation and agitation are operating.
- Cleaning type and number of cleaning cycles.
- Error codes displayed by the printer.
- Recent maintenance, ink replacement or head-strike history.
Questions fréquemment posées
Should White Ink Circulate Continuously?
Not every UV printer uses continuous white ink circulation. Some systems circulate at fixed intervals, while others circulate only when the machine is powered on or during specific operating modes. Follow the manufacturer’s original settings. Do not modify circulation speed or timing without approval.
Can Settled White Ink Still Be Used?
Light separation may be recoverable through the approved agitation or circulation process when the ink is still within its storage period. Ink with hard deposits, large particles, abnormal thickening or contamination should not be circulated through the printer.
Why Does White Ink Disappear After One Night?
Possible causes include pigment settling, insufficient circulation, nozzle drying, poor cap-top sealing, air entering the supply line or unstable pressure. Compare a nozzle test taken before shutdown with one taken after startup and record whether circulation or cleaning restores the pattern.
Why Is There White Ink in the Return Tube but No Nozzle Output?
Return flow confirms that ink is moving through part of the circulation path. It does not confirm that ink is passing correctly through the filter, damper, printhead inlet and nozzles. A blocked damper, closed valve, inactive head channel or electrical problem may still prevent output.
Can I Increase the White Ink Circulation Speed?
Do not increase the speed without technical confirmation. Excessive flow can affect pressure balance, create bubbles, accelerate component wear or disturb the designed ink supply. The correct circulation setting depends on the pump, tube diameter, printhead and pressure-control system.
Should the Entire White Ink System Be Flushed?
A complete flush is not the first step for weak or missing white ink. Flushing may be required after incompatible inks are mixed, ink becomes seriously degraded, the machine is stored for a long period or a technician confirms severe contamination. It should be completed using the correct fluid and procedure.
How Many Cleaning Cycles Should I Run?
Begin with one normal cleaning cycle and compare the nozzle test before and after. If there is no improvement, repeated cleaning may waste ink without resolving a blocked supply, pressure or electrical problem. Send the test results to technical support before using stronger cleaning modes.
Does Missing White Ink Always Mean the Printhead Is Damaged?
No. Missing white ink can result from sedimentation, air, a blocked filter, an empty damper, poor cap sealing, incorrect pressure, a failed pump or an inactive valve. Confirm the supply path and cleaning result before considering printhead replacement.
Conclusion
Effective UV printer white ink troubleshooting should begin with simple evidence rather than immediate disassembly. Check the tank and agitator, observe circulation, print a nozzle test, inspect visible tubes and dampers, and perform one controlled cleaning cycle.
The change between the first and second nozzle tests can help determine whether the problem is light nozzle blockage, pigment settling, unstable ink supply, air leakage, pressure imbalance or a component failure.
If the white ink problem remains, send your supplier the printer model, printhead model, ink batch information, clear nozzle-test photos, a short circulation video and any error messages. Complete information allows an engineer to diagnose the problem faster and reduces unnecessary parts replacement.
Need Technical Support?
Send us your nozzle-test photo, white ink circulation video, printer model and error information. Our technical team will help identify the most likely problem area and recommend the next inspection step.